顯示具有 web 標籤的文章。 顯示所有文章

2018年4月3日 星期二

[Android] 使用 Chrome Browser - Web Inspector 查看 App WebView 行為

之前用了一陣子,然後又忘了,還是寫一下筆記:

  1. 要把 Android app 內使用的 Webview 開啟 setWebContentsDebuggingEnabled
    • WebView.setWebContentsDebuggingEnabled(true);
  2. Android phone 也要開啟 developer mode 和 adb debug
  3. 使用 Chrome browser -> 開發人員選項 -> more tools -> remote devices

順利的話,就會看到手機彈跳出一些視窗,按一按授權就看在 chrome browser 上追蹤 App 內 webview 的行為,像是追蹤其他國家內的網頁資源有被有被 ban 掉 XD

請直接參考:https://developers.google.com/web/tools/chrome-devtools/remote-debugging/?hl=zh-tw

未來可以規劃 release apk 不開啟 setWebContentsDebuggingEnabled ,而 dev apk 再開啟即可。

2018年1月27日 星期六

[PHP] 使用 PHP built-in web server 及 PHP CodeIgniter framework

回想起來,我大概斷斷續續用了 CodeIgniter 七年了,最近才準備在本地開發 XD 開發上就在想 node.js 都有 webpack 等工具了,為啥 PHP 開發上還要先架設個 Web server 而感到納悶。

然而,其實 PHP 早已有 built-in web server 了,雖然只是 single-thread 但在開發上已經非常夠用,就來摸一下怎樣整再一起

$ cd project_web_document_root
$ php -S localhost:8000


接著就在 http://localhost:8000 就可以運行了!
然而,許多 web framework 都靠 routing 把 requests 統一集中到一支程式判斷,似乎已經是個非常基本的設計概念,那在 php built-in web server 也是可以的,他可以設定 routing 機制

$ cd project/web
$ cat ../tools/routing.php
$BASE_DIR = __DIR__ . '/../web' ;
if (file_exists($BASE_DIR . $_SERVER['REQUEST_URI']))
return false;
$_SERVER['SCRIPT_NAME'] = '/index.php';
include_once ($BASE_DIR . '/index.php');
$ php -S localhost:8000 ../tools/routing.php
PHP 7.0.27 Development Server started at Tue Jan 23 12:31:32 2018
Listening on http://localhost:8000
Document root is C:\Users\user\Desktop\ci-project\web
Press Ctrl-C to quit.


更多筆記:changyy/codeiginiter-and-php-built-in-web-server

2017年10月18日 星期三

Firebase 開發筆記 - FCM 與 Web app debug

之前已經小試身手了,在此把 Web app notification debug 訊息紀錄一下。

1. 關於發 push 要用的 Serverkey 擺在 Firebase -> Project -> Settings -> Project settings -> CLOUD MESSAGING -> Project credentials 的 Server key

2. 初始化 index.html ,請至 Firebase -> Project -> Overview -> Add Firebase to your web app,把他埋在 <head></head> 即可

<script src="https://www.gstatic.com/firebasejs/4.5.2/firebase.js"></script>
<script>
  // Initialize Firebase
  var config = {
    apiKey: "YourAPIKey",
    authDomain: "your-app.firebaseapp.com",
    databaseURL: "https://your-app.firebaseio.com",
    projectId: "your-app",
    storageBucket: "your-app.appspot.com",
    messagingSenderId: "your-app-id"
  };
  firebase.initializeApp(config);
</script>


3. 使用 const messaging = firebase.messaging(); 來操作,如要求收訊權限,取得後則進行要 FCM token:
<script>
const messaging = firebase.messaging();
messaging.requestPermission()
.then(function() {
console.log('Notification permission granted.');
try_to_get_token();
})
.catch(function(err) {
console.log('Unable to get permission to notify.', err);
});
function try_to_get_token() {
messaging.getToken()
.then(function(currentToken) {
if (currentToken) {
console.log("currentToken:", currentToken);
} else {
console.log('No Instance ID token available. Request permission to generate one.');
}
})
.catch(function(err) {
console.log('An error occurred while retrieving token. ', err);
});
}
</script>


4. 開發上請使用 Chrome browser ,想要重置 FCM token 可以在 chrome://settings/content/notifications 將指定網域清除

5. 碰到要不到 FCM token 錯誤訊息

browserErrorMessage: "Failed to register a ServiceWorker: A bad HTTP response code (404) was received when fetching the script."
code: "messaging/failed-serviceworker-registration"
message: "Messaging: We are unable to register the default service worker. Failed to register a ServiceWorker: A bad HTTP response code (404) was received when fetching the script. (messaging/failed-serviceworker-registration)."


解法一:在根目錄建置一個空的檔案,檔名為 firebase-messaging-sw.js (最方便的解法)

$ touch /path/www/document_root/firebase-messaging-sw.js

解法二:刻一個 ServiceWorker 處理 (彈性的解法)

$ touch sw.js (與 index.html 同層即可)
$ vim index.html
<script>
const messaging = firebase.messaging();

if ('serviceWorker' in navigator) {
navigator.serviceWorker.register('sw.js').then(function(registration) {
console.log('ServiceWorker registration successful with scope: ', registration.scope);
messaging.useServiceWorker(registration);
//try_to_get_token();
messaging.requestPermission()
.then(function() {
console.log('Notification permission granted.');
try_to_get_token();
})
.catch(function(err) {
console.log('Unable to get permission to notify.', err);
});

}).catch(function(err) {
//registration failed :(
console.log('ServiceWorker registration failed: ', err);
});
}
</script>


6. 建置收訊息的部分:

前景:
<script>
const messaging = firebase.messaging();
messaging.onTokenRefresh(function() {
console.log("onTokenRefresh");
try_to_get_token();
});

messaging.onMessage(function(payload) {
console.log("Message received. ", payload);
});

if ('serviceWorker' in navigator) {
console.log("test 'serviceWorker' in navigator");
navigator.serviceWorker.register('sw.js').then(function(registration) {
console.log('ServiceWorker registration successful with scope: ', registration.scope);
messaging.useServiceWorker(registration);
//try_to_get_token();
messaging.requestPermission()
.then(function() {
console.log('Notification permission granted.');
try_to_get_token();
})
.catch(function(err) {
console.log('Unable to get permission to notify.', err);
});

}).catch(function(err) {
//registration failed :(
console.log('ServiceWorker registration failed: ', err);
});
}

function try_to_get_token() {
messaging.getToken()
.then(function(currentToken) {
if (currentToken) {
console.log("currentToken:", currentToken);
} else {
console.log('No Instance ID token available. Request permission to generate one.');
}
})
.catch(function(err) {
console.log('An error occurred while retrieving token. ', err);
});
}
</script>


背景(/firebase-messaging-sw.js 或是自訂的 ServiceWorker):

$ vim sw.js
// Import and configure the Firebase SDK
// These scripts are made available when the app is served or deployed on Firebase Hosting
// If you do not serve/host your project using Firebase Hosting see https://firebase.google.com/docs/web/setup
importScripts('https://www.gstatic.com/firebasejs/4.5.2/firebase-app.js');
importScripts('https://www.gstatic.com/firebasejs/4.5.2/firebase-messaging.js');
importScripts('https://www.gstatic.com/firebasejs/4.5.2/firebase.js');

  // Initialize Firebase
  var config = {
    apiKey: "YourAppApiKey",
    authDomain: "your-app.firebaseapp.com",
    databaseURL: "https://your-app.firebaseio.com",
    projectId: "your-app",
    storageBucket: "your-app.appspot.com",
    messagingSenderId: "your-app-id"
  };
  firebase.initializeApp(config);

const messaging = firebase.messaging();

// If you would like to customize notifications that are received in the
// background (Web app is closed or not in browser focus) then you should
// implement this optional method.
// [START background_handler]
messaging.setBackgroundMessageHandler(function(payload) {
  console.log('[firebase-messaging-sw.js] Received background message ', payload);
  // Customize notification here
  const notificationTitle = 'Background Message Title';
  const notificationOptions = {
    body: 'Background Message body.',
    icon: '/firebase-logo.png'
  };

  return self.registration.showNotification(notificationTitle,
      notificationOptions);
});
// [END background_handler]


7. 背景工作補充 /firebase-messaging-sw.js (或是自訂的 ServiceWorker)

當 /firebase-messaging-sw.js (或是自訂的 ServiceWorker) 是空白時,這時 web app (chrome browser) 都到訊息時,只會提醒有訊息在背景更新,且前景都不會觸發 messaging.onMessage 的事件。

8. 若發現異常,例如 Web 前景有 token 又收不到訊息時,請留意背景工作是否有實作,建議把 chrome browser 重開,仍不行時,甚至在 chrome://settings/content/notifications 清除重新來過

9.善用 curl command 測試:

curl -X POST -H "Authorization: key=YourAppServerKey" -H "Content-Type: application/json" -d '{
  "notification": {
    "title": "Hello",
    "body": "World",
    "icon": "firebase-logo.png",
    "click_action": "http://localhost:8081"
  },
  "to": "FCM token"
}' "https://fcm.googleapis.com/fcm/send"


10. 若 user 移除接收,送訊息時會收到回饋:

{"multicast_id":####,"success":0,"failure":1,"canonical_ids":0,"results":[{"error":"NotRegistered"}]}

11. FCM 跟用戶有沒有登入(Google帳號)無關

2017年10月17日 星期二

Firebase 開發筆記 - Firebase Cloud Messaging (FCM) 初體驗、 Topic 管理與 Web notification

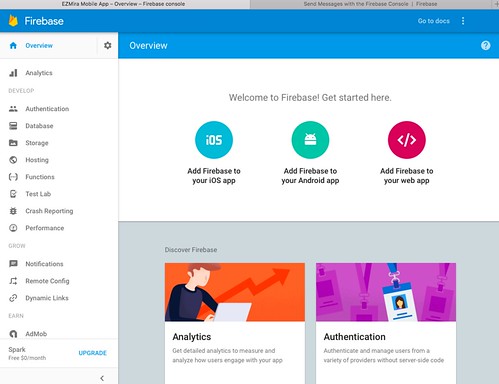
firebase-web-console

最近強者同事推薦使用 FCM ,看了一下,對於計費方式有點抖,若一切免費的話,真的超佛心 :P 由於支援潮流的訊息訂閱架構,基本上幾乎可以不用自行紀錄 notification token 了,用起來很直觀又方便。例如,想要個別通知時,可以每一個 user 給予一個 topic id (如 user id) ,就能夠不用紀錄 raw notification token 單獨發訊給對方!有一點點像用運算取代空間感。

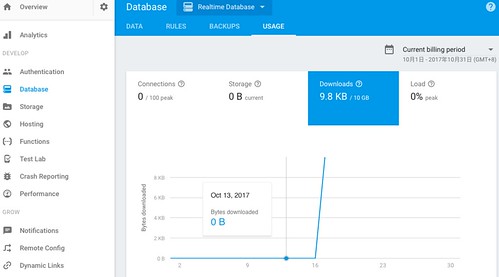
當發送 push 給使用者後,且使用者取得訊息時,關注 Realtime db 的 Download 流量有變動,不知是不是真的要計算流量?若是的話,大約發送一則訊息算 2KB ,而免費版流量 10GB/month,約一個月可以發送 500萬則訊息。

firebase-rt-db-download

若真的要計算流量費的話,那 FCM 就不是免錢,接著要花錢則是 25 美金方案有 20GB/month ,接著更高級則是 $1/GB 計費。

Updated @ 2017/10/18: 與 Firebase 客服聯繫,確認 FCM 不佔用 Realtime Database 流量!並且一口氣發送 100 則後,流量也沒有大量增加,符合預期!超佛心。強者同事提醒,對於 Database Download 流量,可能是 Firebase dashboard/console 的資訊讀寫 ( https://firebase.google.com/docs/database/usage/billing - Firebase console data )

聊聊趣味的地方,關於 Topic 管理機制,當你有 FCM token 後,可以在 server site 幫 device 訂閱 topic 喔!這功能很便利,就像...你紀錄了一堆 GCM token / APNs token 後,自己過濾對象,再進行發送。然而,topic 概念在於"使用情境"知道後,直接刻在 app 端,只是突然新增使用情境時,就得變成新版 app user 可以接受,舊版則無法接受到訊息,這時 server site 若有記錄 FCM token 時,就可以代勞幫忙訂閱:

https://developers.google.com/instance-id/reference/server#manage_relationship_maps_for_multiple_app_instances

https://iid.googleapis.com/iid/v1:batchAdd
Content-Type:application/json
Authorization:key=API_KEY
{
   "to": "/topics/movies",
   "registration_tokens": ["nKctODamlM4:CKrh_PC8kIb7O...", "1uoasi24:9jsjwuw...", "798aywu:cba420..."],
}


同理,也可以取消訂閱:https://iid.googleapis.com/iid/v1:batchRemove

若 server site 是 node.js 的,可以直接用 SDK :https://firebase.google.com/docs/cloud-messaging/admin/manage-topic-subscriptions

最後,筆記一下 Web app 的部分:假設網站服務位置為 https://example.com/fcm/ ,預設都要在根目錄埋上 firebase-messaging-sw.js 檔案,可以空白。

$ touch /var/www/firebase-messaging-sw.js
$ vim /var/www/fcm/index.html
<html>
<head>
<script src="https://www.gstatic.com/firebasejs/4.5.2/firebase.js"></script>
<script>
// Initialize Firebase
var config = {
apiKey: "your-app-apikey",
authDomain: "your-app.firebaseapp.com",
databaseURL: "https://your-app.firebaseio.com",
projectId: "your-app",
storageBucket: "your-app.appspot.com",
messagingSenderId: "your-app-id"
};
firebase.initializeApp(config);
</script>
</head>
<body>
<script>
const messaging = firebase.messaging();

messaging.onTokenRefresh(function() {
messaging.getToken()
.then(function(refreshedToken) {
console.log('Token refreshed.', refreshedToken);
})
.catch(function(err) {
console.log('Unable to retrieve refreshed token ', err);
});
});

messaging.onMessage(function(payload) {
console.log("Message received. ", payload);
});

messaging.requestPermission()
.then(function() {
console.log('Notification permission granted.');
resetUI();
})
.catch(function(err) {
console.log('Unable to get permission to notify.', err);
});

function resetUI() {
console.log('resetUI');
messaging.getToken()
.then(function(currentToken) {
if (currentToken) {
console.log("currentToken:", currentToken);
} else {
console.log('No Instance ID token available. Request permission to generate one.');
}
})
.catch(function(err) {
console.log('An error occurred while retrieving token. ', err);
});
}
</script>
</body>
</html>


如此一來,用 chrome browser 瀏覽 https://example.com/fcm/ 會彈跳視窗詢問是否接收訊息,點擊接受後,在 dev tools 的 console 可以看到:

Notification permission granted.
resetUI
currentToken: thisClientFCMToken

如此一來,就可以對他發訊、設定此 client 去訂閱 topic 了:

$ curl -X POST -H "Authorization: key=YourFCMAppServerKey" -H "Content-Type: application/json" -d '{
  "notification": {
    "title": "Hello",
    "body": "World",
    "icon": "firebase-logo.png",
    "click_action": "http://localhost:8081"
  },
  "to": "thisClientFCMToken"
}' "https://fcm.googleapis.com/fcm/send"

$ curl -X POST -H "Authorization: key= YourFCMAppServerKey" -H "Content-Type: application/json" -d '{
  "registration_tokens":["thisClientFCMToken"],
  "to": "/topics/foo-bar"
}' "https://iid.googleapis.com/iid/v1:batchAdd"

$ curl -X POST -H "Authorization: key= YourFCMAppServerKey" -H "Content-Type: application/json" -d '{
  "notification": {
    "title": "Hello",
    "body": "World",
    "icon": "firebase-logo.png",
    "click_action": "http://localhost:8081"
  },
  "to": "/topics/foo-bar"
}' "https://fcm.googleapis.com/fcm/send"

2017年6月14日 星期三

AWS 筆記 - AWS ELB 與 Nginx 之 DOS 惡意攻擊者的處理方式

這個緣由是這樣的,有一台 Server 被狂打,但架構是:

Remote client <-> AWS ELB <-> Web server (Nginx) <-> Application

當有用戶非常好心地發大量 request 來檢查機器漏洞,若 Nginx 預設都沒多做設定,那 access.log 都會只記錄到 AWS ELB IP ,也就是不能把 access.log 紀錄的 IP 拿來 ban ,會變成 ban 掉 ELB。

而 AWS 提供的 Security group 預設是從 Allow 的角度,若要特意 ban 掉某個 IP 會有點難搞,例如要改寫防火牆規則,因此,最後就改成從實體 server 去阻擋遠端 client request 了。

步驟一:先讓 Nginx 可以記錄到真實的 remote ip

/etc/nginx/nginx.conf

http {
    # ...
    real_ip_header X-Forwarded-For;
    set_real_ip_from 0.0.0.0/0;

    log_format  main  '$remote_addr - $remote_user [$time_local] "$request" '
                      '$status $body_bytes_sent "$http_referer" '
                      '"$http_user_agent" "$http_x_forwarded_for"';
    # ...
}


如此一來,access.log 的 remote_addr 就可以不是 AWS ELB IP 了。

步驟二:用 Nginx 去 deny ip

/etc/nginx/conf.d/your-service.conf

server {
  # ...
  deny RemoteIP;
  # ...
}


這樣設定後,在用 sudo nginx -t 檢查語法後,就可以啟用了

在此不用 iptables 去阻擋的主因是封包進來的 IP 都是 AWS ELB ,所以才改從 Nginx/App 這層取阻擋。缺點就是 access.log 還是一直肥,好處是可以觀察 access.log 看看對方是不是放棄攻擊了?XD

未來若碰到 DDOS 就...

2015年10月24日 星期六

[Linux] 調校 Apache Web server 筆記 ab、systcl.conf、limits.conf、mpm_prefork.conf @ Ubuntu 14.04

最近又播空出來處理一下,之前機器在規劃時,幾乎都用系統預設的資源,接著就直接上 AWS Auto scaling,整體上進入 m3.medium 都還堪用,直到要上到 m3.large 規模時,開始發現當初設置的 Auto scaling rules 不是很適當。於是乎把 CPU 靈敏度下調,例如 CPU 只要衝到 15% 使用率就開新機器,反正大部分的時間都夠用 :P

而現在就老老實實先用 apache benchmark 試試! 首先操作環境都是 AWS EC2,先替機器上 Elastic IP 吧!因為 想測不同規格的機器,這時用個 Elastic IP 會方便一點,避免機器 IP 被換掉,此外,建議發動 ab 的機器規格要好於壓力測試的機器。

當發動 ab 測試的機器得到 apr_socket_recv: Connection reset by peer (104) 而被壓力測試的機器 dmesg 出現 TCP: TCP: Possible SYN flooding on port 80. Dropping request.  Check SNMP counters. 時,請調整壓力測試機器。

$ sudo vim /etc/sysctl.conf
net.ipv6.conf.all.disable_ipv6 = 1
net.ipv4.tcp_tw_reuse = 1
net.ipv4.tcp_tw_recycle = 1
net.ipv4.tcp_syncookies = 0
net.ipv4.tcp_synack_retries = 1
net.ipv4.tcp_max_syn_backlog = 102400
net.ipv4.tcp_max_tw_buckets = 102400
$ sudo sysctl -p


其中 tcp_tw 代表 TCP Socket Time-Wait,而 syncookies 為 SYN Cookies 機制,而 syn_backlog 跟 tw_buckets 的數量,調大就是允許讓系統花多一點資源讓 client 等待而非直接 reject client。

而發動機器 file open 數量太小時,會出現 socket: Too many open files (24) 資訊,這時就先用 root 角色,並用 ulimit -n 8000 調高限制,若要保持其資源限制,就修改 /etc/security/limits.conf

$ sudo vim /etc/security/limits.conf
* soft nofile 12345
* hard nofile 23456

此例就是允許任何人開 12345 個檔案。

接著 ab 常用指令:

$ ab -c 300 -n 50000 http://ip/

記得若測試的 IP 位置在首頁,要有 "/" 結尾 :P 接著關注報表,例如 Requests per second 跟 Time per request 數字,若 requests per second 比 concurrent 數字還要大,那就調大 -c 的參數試試,去尋找一個合適的點即可。

另外,由於 Apache web server 預設採用 prefork MPM 模式,那邊也有些資源上限要調整:

$ sudo vim /etc/apache2/mods-enabled/mpm_prefork.conf
# prefork MPM
# StartServers: number of server processes to start
# MinSpareServers: minimum number of server processes which are kept spare
# MaxSpareServers: maximum number of server processes which are kept spare
# MaxRequestWorkers: maximum number of server processes allowed to start
# MaxConnectionsPerChild: maximum number of requests a server process serves

<IfModule mpm_prefork_module>
ServerLimit 7500
StartServers 20
MinSpareServers 15
MaxSpareServers 50
MaxRequestWorkers 7500
MaxConnectionsPerChild 0
</IfModule>

$ sudo service apache2 reload


最後心得...在 AWS EC2 m3.large 的機器上,大多每秒就是處理一千五附近的連線,也就同時可處理 1500 連線。可以用 ab -k -c 1500 -n 5000000 測試看看。

2015年5月14日 星期四

AWS 筆記 - 關於 Amazon EC2、Elastic Load Balancer (ELB)、Auto Scaling 與 CPU loading 過低問題 @ Ubuntu 14.04, Apache 2.4

使用 ELB + Auto Scaling 好一陣子了,最近因為服務量變大導致 Web Server 變多,然而,在部署程式方面就累了許多,因此朝 Scaling up 來進行一下,限縮機器數量並提升機器規格。

在這個過程中,從 m3.medium 改到 m3.large 或 m3.xlarge 等,卻發現越高級的機器,其 CPU Loading 衝不上去,並且限縮機器後導致服務極為不穩,連 Health check 也發現。但明明機器都不忙啊?!

接著因為非常忙,拖了兩個禮拜才正視這個問題。追了許多後,發現...只是 Apache Multi-Processing Module (MPM) 設定未同步拉高 XD 好蠢的一件事啊。此外,由於服務眾多,尚未有空最佳化,就先繼續用 prefork 架構了。

$ apache2 -v
Server version: Apache/2.4.7 (Ubuntu)
Server built:   Mar 10 2015 13:05:59
$ sudo vim /etc/apache2/mods-enabled/mpm_prefork.conf
<IfModule mpm_prefork_module>
        ServerLimit                7500 # 預設才 256
        StartServers               20
        MinSpareServers           15
        MaxSpareServers            50
        MaxRequestWorkers          7500 # 預設才 256
        MaxConnectionsPerChild     0
</IfModule>


總之,ServerLimit 跟 MaxRequestWorkers 就看當下的機器資訊,例如記憶體等等。

透過 Web server 執行的環境調整,機器的負載度自然可以提升,接著 Auto Scaling 的機制就可用啦!原先在 m3.medium 的機器是單核,而在 m3.large 開始就是多核心了!效能就能更往上衝囉。很妙地用系統預設的 prefork.conf 在 m3.medium 還混的不錯 :P 包含 CPU 會依照 requests 量變化,不像同樣的設定檔搬到多核心後就失效了,CPU 衝不起來,導致 Auto Scaling 也失效!

整體上,這次碰到 service 不穩的主因:

total requests 一直保持一個數量,而原先開 m3.medium x N ,想說機器提升成 m3.large 就把數量調整成一半,結果 web server 數量降低,再加上 prefork.conf 的設定,導致能服務的 requests 量也降低!而 Health check 無法正常被驗證,接著 AWS Scaling 會判斷機器出事要下線,甚至 requests 不導過去,頻頻出現:

503 Service Unavailable: Back-end server is at capacity

如今終於解掉了 :P Health check requests 也能被服務到,機器自然就不會被判斷成有問題,自然就解掉 503 Service Unavailable 現象。

最後,如果要追蹤網路流量,可以試試 nload 這個指令,看整體流量還滿方便的。

2015年4月8日 星期三

PHP CodeIgniter - 透過 Apache RewriteRule 限制 CGI 功能

基於一些開發需求,想要侷限網站的功能。剛好這個網站服務是用 PHP CodeIgniter 開發的,整套都是走 RewriteRule 來進行,例如一個 URL 位置,都一律導向到 PHP CodeIgniter Project 的 index.php?/path 來分析。

假設原本網站有 3 個主要網址,分別是 /api, /shopping, / 等,假設想要讓此網站只開啟 /api 時,這時就可以透過 Apache RewriteRule 來限制:

<VirtualHost *:80>
DocumentRoot /ci-project/
DirectoryIndex index.html index.php index.htm

# empty page
Alias /empty     /var/www/html/

<Directory />
Options FollowSymLinks
AllowOverride None
</Directory>

<Directory /var/www/html/>
Options FollowSymLinks
AllowOverride None
DirectoryIndex index.html index.php index.htm
Require all granted
Satisfy Any
</Directory>

<Directory /ci-project>
Options FollowSymLinks
DirectoryIndex index.php
AllowOverride None
#AllowOverride All
Require all granted
Satisfy Any

<IfModule mod_rewrite.c>
RewriteEngine On
#LogLevel alert rewrite:trace6
RewriteBase /

# disable index.php with empty QUERY_STRING
RewriteCond %{QUERY_STRING} ^$
RewriteRule ^index\.php$ /empty/ [L]

RewriteCond $1 !^(index\.php|images|css|js|favicon\.ico)
# enable /api only
RewriteCond $1 ^api.*$
RewriteCond %{REQUEST_FILENAME} !-f
RewriteCond %{REQUEST_FILENAME} !-d
RewriteRule ^(.*)$ ./index.php?/$1 [L,QSA]
</IfModule>
</Directory>
</VirtualHost>


如此一來,只要使用者逛 / 位置,則會顯示 /var/www/html 的資料,而逛 /api 系列時,則是可以正常引導到 PHP CodeIgniter 相關程式碼來處理。

2014年5月23日 星期五

使用 lnyx 抽取 Web Page 所有的 Links

沒想到 lynx 真好用 XD 比用 Wget 好的地方是不用去重組一些 relative link,那缺點就會是要避開同一個 page 的 anchor (<a href="#me></a>) 用法,但是...有些 Javascript 的或是其他 MVC 架構的網站,仍會用 anchor 來取資料。

$ lynx -dump -listonly https://tw.yahoo.com | grep -o '^\s\{1,\}[0-9]\{1,\}..*$' | sed -e 's/^[[:space:]]\{1,\}[0-9]\{1,\}\.[[:space:]]//g' | uniq

2014年5月7日 星期三

AWS 筆記 - 使用 Amazon EC2 進行 Deploying Web services

稍微把玩 AWS Elastic Load Balancing 跟 Auto Scaling 後,大概有一點粗淺的心得:
  • 開一台機器,如 micro 等級,並設定這台機器關機也不下線,可專門用於製作 AMI
  • EC2 micro 採用 EBS 管理,每一次製作 AMI 會產生新的 EBS snapshot,記得定時去清理
  • 程式碼若是透過 git 管理,可以在 /etc/rc.local 上設定開機自動更新方式,至少 AMI 不是最新程式碼時也還能堪用(但 git server 掛了就...)
  • 如果想要透過 web cgi 更新,記得把 source tree 的 owner 或 group (搭配775方式) 設定 www-data,可以用 sudo -u www-data /tmp/update.sh 進行測試
AWS Elastic Load Balancing:
  • 使用 AWS ELB 時,可以讓多台機器綁定在固定的 DNS Name,記得需要處理一下多台機器進行切換其 Session/Cookie 問題,例如單純的使用情境,可以透過設定 Stickiness: LBCookieStickinessPolicy, expirationPeriod='600' 等方式來應付等
  • 對於有使用 HTTP Authentication 的 web server 而言,因為帳密是一直隨 browser 傳給 web server 的(就像 cookie一樣),所以 ELB 再切換機器時,不會因機器不同台而再次詢問帳密
AWS Auto Scaling:
  • 對 Auto Scaling 而言,預設機器都是關機後就下線,除非改掉預設方式,不然更新系統時 reboot 的結果就是開一台新機器,此外,把 Auto Scaling Group 刪掉等同把機器都下線
  • 透過製作新的 AMI 來取代系統更新時,而原先設定好的 Auto Scaling Launch Config 不能更新採用的 AMI,但可透過新增新的 Launch Config 後,更新 Auto Scaling 設定後,再刪掉舊的 Launch config 等