顯示具有 filter 標籤的文章。 顯示所有文章

2021年6月12日 星期六

Node.js 筆記 - 使用 Puppeteer 監控瀏覽網頁的 Requests 跟 HTML Code @ macOS 11.4, node v14.14.0, npm 6.14.5

緣起於在追蹤網站架構時,每次都靠 chrome browser 開發人員工具去追蹤特定的 request 還好,若需要大量瀏覽找尋一些蛛絲馬跡時,就會很煩!以前很閒時,就會跳下去寫 chrome extension 或是熱衷於 C++ 時,就會寫一點點  Chromium Embedded Framework 來寫個小型瀏覽器,最後想起來試試看 Puppeteer 吧!

使用 Puppeteer 很輕鬆,除了是很常見的 Javascript 語言外,Puppeteer 套件提供了網頁端常見的事件偵測、所發的 Request 清單。就這樣拼拼湊湊即可完工:

(async () => {
const browser = await puppeteer.launch({headless: false});
//const page = await browser.newPage();
const context = await browser.createIncognitoBrowserContext();
const page = await context.newPage();
await page.emulate(device);
await page.setRequestInterception(true);

// https://pptr.dev/#?product=Puppeteer&version=v10.0.0&show=api-event-domcontentloaded
// https://developer.mozilla.org/en-US/docs/Web/API/Window/DOMContentLoaded_event
//
// The DOMContentLoaded event fires when the initial HTML document has been completely loaded and parsed, without waiting for stylesheets, images, and subframes to finish loading.
//
page.on('domcontentloaded', () => {
console.log('on.domcontentloaded');
});

// https://pptr.dev/#?product=Puppeteer&version=v10.0.0&show=api-event-domcontentloaded
// https://developer.mozilla.org/en-US/docs/Web/API/Window/load_event
//
// The load event is fired when the whole page has loaded, including all dependent resources such as stylesheets and images. This is in contrast to DOMContentLoaded, which is fired as soon as the page DOM has been loaded, without waiting for resources to finish loading.
//
page.on('load', async () => {
console.log('on.load');
watchTags(page, watch_tags);
});

// https://pptr.dev/#?product=Puppeteer&version=v10.0.0&show=api-event-framenavigated
// https://pptr.dev/#?product=Puppeteer&version=v10.0.0&show=api-class-frame
page.on('framenavigated', frame => {
console.log('on.framenavigated: '+frame.url());
});

// https://pptr.dev/#?product=Puppeteer&version=v10.0.0&show=api-event-request
// https://pptr.dev/#?product=Puppeteer&version=v10.0.0&show=api-class-httprequest
page.on('request', request => {
watchRequest(page.url(), request.url());
if (skip_resource_type[ request.resourceType() ])
request.abort();
else
request.continue();
});

// https://pptr.dev/#?product=Puppeteer&version=v10.0.0&show=api-event-response
// https://pptr.dev/#?product=Puppeteer&version=v10.0.0&show=api-class-httpresponse
page.on('response', response => {
//console.log('on.response: '+response.url());
});

while (true) {
if (url_init.length > 0) {
const target_url = url_init.shift();
await page.goto(target_url, {
waitUntil: 'networkidle0',
});
console.log('networkidle0');
}
if (url_init.length > 0)
await sleep(5000);
else
await sleep(50);
}
await browser.close();
})();

如此,搭配 command line 使用,就可很快的監控想要的 request 規則,或是 HTML DOM Tree 的變化,例如監控 <script> 的讀取位置在哪:

% node index.js -url "https://tw.yahoo.com" -tag "script.src"
...
on.load
[WATCH][TAG] script: src
Web URL: [https://tw.yahoo.com/]
[
  { src: 'https://s.yimg.com/wi/ytc.js' },
  {
    src: 'https://tw.mobi.yahoo.com/polyfill.min.js?features=array.isarray%2Carray.prototype.every%2Carray.prototype.foreach%2Carray.prototype.indexof%2Carray.prototype.map%2Cdate.now%2Cfunction.prototype.bind%2Cobject.keys%2Cstring.prototype.trim%2Cobject.defineproperty%2Cobject.defineproperties%2Cobject.create%2Cobject.freeze%2Carray.prototype.filter%2Carray.prototype.reduce%2Cobject.assign%2Cpromise%2Crequestanimationframe%2Carray.prototype.some%2Cobject.getownpropertynames%2Clocale-data-en-us%2Cintl%2Clocale-data-zh-hant-tw&version=2.1.23'
  },
  { src: 'https://s.yimg.com/aaq/yc/2.9.0/zh.js' },
  {
    src: 'https://s.yimg.com/ud/fp/js/vendor.174522d6d76b51858b93.min.js'
  },
  { src: 'https://s.yimg.com/ud/fp/js/common.js' },
  { src: 'https://s.yimg.com/oa/consent.js' },
  { src: 'https://consent.cmp.oath.com/cmpStub.min.js' },
  { src: 'https://consent.cmp.oath.com/cmp.js' },
  { src: 'https://s.yimg.com/ss/rapid3.js' },
  { src: 'https://s.yimg.com/rq/darla/boot.js' },
  {
    src: 'https://s.yimg.com/ud/fp/js/main.6622c6aeda051386afaa.min.js'
  },
  { src: 'https://mbp.yimg.com/sy/os/yaft/yaft-0.3.22.min.js' },
  {
    src: 'https://mbp.yimg.com/sy/os/yaft/yaft-plugin-aftnoad-0.1.3.min.js'
  },
  { src: 'https://s.yimg.com/aaq/vzm/perf-vitals_1.0.0.js' },
  {
    src: 'https://fc.yahoo.com/sdarla/php/client.php?dm=1&lang=zh-Hant-TW'
  },
  {
    src: 'https://s.yimg.com/aaq/c/e7fecc0.caas-abu_highlander.min.js'
  }
]
...

2019年11月25日 星期一

jq 指令筆記 - 使用 to_entries 保留 key/value 資料,再用 select / index / match 過濾資料

人生就是有那種怪怪的堅持,明明寫個 php 或 python 就立刻可以解掉的需求,偏偏愛用 jq 來處理 XD

故事是來自於有個 key-value pair 的 json 資料:

% echo '{"A":{"field":"v1"},"B":{"field":"v2"}}' | jq ''
{
  "A": {
    "field": "v1"
  },
  "B": {
    "field": "v2"
  }
}


想要透過 jq 過濾時,也能保留 key 資料,這時就用 to_entries 來達成:

% echo '{"A":{"field":"v1"},"B":{"field":"v2"}}' | jq 'to_entries[]'
[
  {
    "key": "A",
    "value": {
      "field": "v1"
    }
  },
  {
    "key": "B",
    "value": {
      "field": "v2"
    }
  }
]

% echo '{"A":{"field":"v1"},"B":{"field":"v2"}}' | jq 'to_entries[]'
{
  "key": "A",
  "value": {
    "field": "v1"
  }
}
{
  "key": "B",
  "value": {
    "field": "v2"
  }
}


接著要再過濾指定欄位帶有 關鍵字 時,就靠 select 跟 index 來達成:

% echo '{"A":{"field":"v1"},"B":{"field":"v2"}}' | jq 'to_entries[] | select( .value.field | index("v2") >= 0 )'
{
  "key": "B",
  "value": {
    "field": "v2"
  }
}


此例是輸出 value.field 數值帶有 v2 關鍵字。而 index 之外的還有 match 等支援 regular expression 的用法,只是要用 !match 時有點卡卡串不太起來,就乾脆用 index 來處理。

2019年9月20日 星期五

jq 指令筆記 - 整理 JSON 資料,使用 select / index 過濾關鍵字

用 jq 去整理 api/json 的資料的。整個需求是:

  • API 回傳的 JSON 資料中,是一個 array 形式,裡頭的元素是 key-value pair
  • 透過 jq 把符合我需要的 資料列出
  • 檢查在某些條件上,有哪些東西,最後回歸到 comm 的工具幫忙導出結果進行比較

筆記一下 jq 項目:

$ cat /tmp/api.json | jq '.["data"]'
[
  {
    "field": "hello"
  },
  {
    "field": "world"
  }
]
$ cat /tmp/api.json | jq '.["data"] | .[] '
{
  "field": "hello"
}
{
  "field": "world"
}
$ cat /tmp/api.json | jq '.["data"] | .[] | select (.field | index("e") > 0) '
{
  "field": "hello"
}
$ cat /tmp/api.json | jq '.["data"] | .[] | select (.field | index("e") > 0) | .field '
"hello"


如此,可以結果導入檔案,如果需要比較檔案內的差異,就可以用 comm 指令來做事

2019年1月25日 星期五

Google Analytics 使用筆記 - URI GROUPING

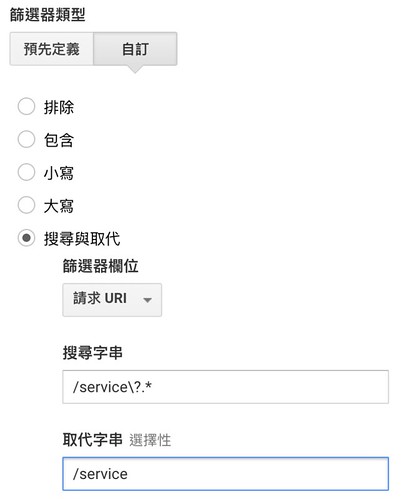
GA - 資料檢視 - 篩選器 - 搜尋與取代

這半年除了狂用 GA API 自製 Dashboard 外,偶爾也要強迫自已直接用 GA Web console 做事。在研究資料過濾/整頓時,發現 GA 的 資料檢視 已經做得很完美了,有個非常貼心的小功能稱作 篩選器 ,裏頭新增規則時可以做到 URI grouping 效果!

也就是,有些網址會帶很多參數,如:

/service?country=US
/service?country=TW
/service?country=JP&lang=

可以透過篩選器把他們都整合成一則:/service

如此,在觀看即時數據時,就可以一眼看出哪個服務最多人使用了!

使用方式:

資料檢視 -> 挑選/新建一個項目 -> 篩選器 -> 新增篩選器 -> 篩選器類型 選擇 自訂 -> 搜尋與取代

設定完後,下方還有 "驗證這個篩選器" ,很貼心

接著就能靠正規表達式子取代掉,達成 URI Grouping 效果。後續也可以透過這個篩選器,把不要看的流量去掉,讓人可以專注在該重視的項目上。

2017年9月27日 星期三

[Unix] 透過 jq 處理時間比較 @ macOS / jq-1.5

看到同事在處理 AWS AMI 的管理,用到了 jq 在過濾舊版資料來進行刪除,我也練了一下 jq 就順便筆記一下:

$ echo '{}' | jq 'now'
1506504885.298058
$ echo '{}' | jq 'now | gmtime '
[
  2017,
  8,
  27,
  9,
  34,
  47.25080108642578,
  3,
  269
]
$ echo '{}' | jq 'now | gmtime | todate'
"2017-09-27T09:35:00Z"
$ echo '{}' | jq 'now | gmtime | todate[:10]'
"2017-09-27"
$ echo '{}' | jq 'now | todate[:10]'
"2017-09-27"


得到三天前的時間:

$ echo '{}' | jq '(now - 86400*3) | gmtime | todate[:10]'
"2017-09-24"


假想一票資料:

$ echo '[{"StartTime": "2017-09-21T10:32:33.000Z"},{"StartTime": "2017-09-22T10:32:33.000Z"},{"StartTime": "2017-09-26T10:32:33.000Z"},{"StartTime": "2017-09-24T10:32:33.000Z"},{"StartTime": "2017-09-25T10:32:33.000Z"},{"StartTime": "2017-09-19T10:32:33.000Z"},{"StartTime": "2017-09-01T10:32:33.000Z"},{"StartTime": "2017-09-92T10:32:33.000Z"}]' | jq ''
[
  {
    "StartTime": "2017-09-21T10:32:33.000Z"
  },
  {
    "StartTime": "2017-09-22T10:32:33.000Z"
  },
  {
    "StartTime": "2017-09-26T10:32:33.000Z"
  },
  {
    "StartTime": "2017-09-24T10:32:33.000Z"
  },
  {
    "StartTime": "2017-09-25T10:32:33.000Z"
  },
  {
    "StartTime": "2017-09-19T10:32:33.000Z"
  },
  {
    "StartTime": "2017-09-01T10:32:33.000Z"
  },
  {
    "StartTime": "2017-09-92T10:32:33.000Z"
  }
]


挑出超過七天者(此乃字串比對):

$ echo '[{"StartTime": "2017-09-21T10:32:33.000Z"},{"StartTime": "2017-09-22T10:32:33.000Z"},{"StartTime": "2017-09-26T10:32:33.000Z"},{"StartTime": "2017-09-24T10:32:33.000Z"},{"StartTime": "2017-09-25T10:32:33.000Z"},{"StartTime": "2017-09-19T10:32:33.000Z"},{"StartTime": "2017-09-01T10:32:33.000Z"},{"StartTime": "2017-09-92T10:32:33.000Z"}]' | jq '.[] | if (.StartTime[0:10] < (now - (86400* 7) | todate[0:10]) ) then .StartTime else empty end '
"2017-09-19T10:32:33.000Z"
"2017-09-01T10:32:33.000Z"

2017年9月19日 星期二

[Python] 機器學習筆記 - 使用 Pandas 處理 CSV 格式、過濾資料與自身 Index 更新問題

使用 Pandas 套件進行分析資料時,它提供的功能包括便利的資料過濾:

import seaborn as sns
import pandas as pd

dataset = sns.load_dataset("tips")
print(dataset)
print(dataset.shape)
print(dataset.columns)

print("list total_bill > 30:")
print(dataset[ dataset['total_bill'] > 30 ] )


然而,預設 Pandas 會記錄原先的 raw index ,這也有不錯的功用,但有時希望照新的架構顯示,需要再多用 reset_index():

print("list total_bill > 30 and tip < 4:")
print(dataset[ (dataset['total_bill'] > 30) & (dataset['tip'] < 4) ] )

print("rebuild index:")
dataset = dataset[ (dataset['total_bill'] > 30) & (dataset['tip'] < 4) ]
dataset = dataset.reset_index()
print(dataset)


連續動作:

$ python pandas_study.py
     total_bill   tip     sex smoker   day    time  size
0         16.99  1.01  Female     No   Sun  Dinner     2
1         10.34  1.66    Male     No   Sun  Dinner     3
2         21.01  3.50    Male     No   Sun  Dinner     3
3         23.68  3.31    Male     No   Sun  Dinner     2
4         24.59  3.61  Female     No   Sun  Dinner     4
5         25.29  4.71    Male     No   Sun  Dinner     4
6          8.77  2.00    Male     No   Sun  Dinner     2
7         26.88  3.12    Male     No   Sun  Dinner     4
8         15.04  1.96    Male     No   Sun  Dinner     2
9         14.78  3.23    Male     No   Sun  Dinner     2
10        10.27  1.71    Male     No   Sun  Dinner     2
11        35.26  5.00  Female     No   Sun  Dinner     4
12        15.42  1.57    Male     No   Sun  Dinner     2
13        18.43  3.00    Male     No   Sun  Dinner     4
14        14.83  3.02  Female     No   Sun  Dinner     2
15        21.58  3.92    Male     No   Sun  Dinner     2
16        10.33  1.67  Female     No   Sun  Dinner     3
17        16.29  3.71    Male     No   Sun  Dinner     3
18        16.97  3.50  Female     No   Sun  Dinner     3
19        20.65  3.35    Male     No   Sat  Dinner     3
20        17.92  4.08    Male     No   Sat  Dinner     2
21        20.29  2.75  Female     No   Sat  Dinner     2
22        15.77  2.23  Female     No   Sat  Dinner     2
23        39.42  7.58    Male     No   Sat  Dinner     4
24        19.82  3.18    Male     No   Sat  Dinner     2
25        17.81  2.34    Male     No   Sat  Dinner     4
26        13.37  2.00    Male     No   Sat  Dinner     2
27        12.69  2.00    Male     No   Sat  Dinner     2
28        21.70  4.30    Male     No   Sat  Dinner     2
29        19.65  3.00  Female     No   Sat  Dinner     2
..          ...   ...     ...    ...   ...     ...   ...
214       28.17  6.50  Female    Yes   Sat  Dinner     3
215       12.90  1.10  Female    Yes   Sat  Dinner     2
216       28.15  3.00    Male    Yes   Sat  Dinner     5
217       11.59  1.50    Male    Yes   Sat  Dinner     2
218        7.74  1.44    Male    Yes   Sat  Dinner     2
219       30.14  3.09  Female    Yes   Sat  Dinner     4
220       12.16  2.20    Male    Yes   Fri   Lunch     2
221       13.42  3.48  Female    Yes   Fri   Lunch     2
222        8.58  1.92    Male    Yes   Fri   Lunch     1
223       15.98  3.00  Female     No   Fri   Lunch     3
224       13.42  1.58    Male    Yes   Fri   Lunch     2
225       16.27  2.50  Female    Yes   Fri   Lunch     2
226       10.09  2.00  Female    Yes   Fri   Lunch     2
227       20.45  3.00    Male     No   Sat  Dinner     4
228       13.28  2.72    Male     No   Sat  Dinner     2
229       22.12  2.88  Female    Yes   Sat  Dinner     2
230       24.01  2.00    Male    Yes   Sat  Dinner     4
231       15.69  3.00    Male    Yes   Sat  Dinner     3
232       11.61  3.39    Male     No   Sat  Dinner     2
233       10.77  1.47    Male     No   Sat  Dinner     2
234       15.53  3.00    Male    Yes   Sat  Dinner     2
235       10.07  1.25    Male     No   Sat  Dinner     2
236       12.60  1.00    Male    Yes   Sat  Dinner     2
237       32.83  1.17    Male    Yes   Sat  Dinner     2
238       35.83  4.67  Female     No   Sat  Dinner     3
239       29.03  5.92    Male     No   Sat  Dinner     3
240       27.18  2.00  Female    Yes   Sat  Dinner     2
241       22.67  2.00    Male    Yes   Sat  Dinner     2
242       17.82  1.75    Male     No   Sat  Dinner     2
243       18.78  3.00  Female     No  Thur  Dinner     2

[244 rows x 7 columns]
(244, 7)
Index(['total_bill', 'tip', 'sex', 'smoker', 'day', 'time', 'size'], dtype='object')
list total_bill > 30:
     total_bill    tip     sex smoker   day    time  size
11        35.26   5.00  Female     No   Sun  Dinner     4
23        39.42   7.58    Male     No   Sat  Dinner     4
39        31.27   5.00    Male     No   Sat  Dinner     3
44        30.40   5.60    Male     No   Sun  Dinner     4
47        32.40   6.00    Male     No   Sun  Dinner     4
52        34.81   5.20  Female     No   Sun  Dinner     4
56        38.01   3.00    Male    Yes   Sat  Dinner     4
59        48.27   6.73    Male     No   Sat  Dinner     4
83        32.68   5.00    Male    Yes  Thur   Lunch     2
85        34.83   5.17  Female     No  Thur   Lunch     4
95        40.17   4.73    Male    Yes   Fri  Dinner     4
102       44.30   2.50  Female    Yes   Sat  Dinner     3
112       38.07   4.00    Male     No   Sun  Dinner     3
141       34.30   6.70    Male     No  Thur   Lunch     6
142       41.19   5.00    Male     No  Thur   Lunch     5
156       48.17   5.00    Male     No   Sun  Dinner     6
167       31.71   4.50    Male     No   Sun  Dinner     4
170       50.81  10.00    Male    Yes   Sat  Dinner     3
173       31.85   3.18    Male    Yes   Sun  Dinner     2
175       32.90   3.11    Male    Yes   Sun  Dinner     2
179       34.63   3.55    Male    Yes   Sun  Dinner     2
180       34.65   3.68    Male    Yes   Sun  Dinner     4
182       45.35   3.50    Male    Yes   Sun  Dinner     3
184       40.55   3.00    Male    Yes   Sun  Dinner     2
187       30.46   2.00    Male    Yes   Sun  Dinner     5
197       43.11   5.00  Female    Yes  Thur   Lunch     4
207       38.73   3.00    Male    Yes   Sat  Dinner     4
210       30.06   2.00    Male    Yes   Sat  Dinner     3
212       48.33   9.00    Male     No   Sat  Dinner     4
219       30.14   3.09  Female    Yes   Sat  Dinner     4
237       32.83   1.17    Male    Yes   Sat  Dinner     2
238       35.83   4.67  Female     No   Sat  Dinner     3
list total_bill > 30 and tip < 4:
print index:
index: 56
index: 102
index: 173
index: 175
index: 179
index: 180
index: 182
index: 184
index: 187
index: 207
index: 210
index: 219
index: 237
rebuild index:
    index  total_bill   tip     sex smoker  day    time  size
0      56       38.01  3.00    Male    Yes  Sat  Dinner     4
1     102       44.30  2.50  Female    Yes  Sat  Dinner     3
2     173       31.85  3.18    Male    Yes  Sun  Dinner     2
3     175       32.90  3.11    Male    Yes  Sun  Dinner     2
4     179       34.63  3.55    Male    Yes  Sun  Dinner     2
5     180       34.65  3.68    Male    Yes  Sun  Dinner     4
6     182       45.35  3.50    Male    Yes  Sun  Dinner     3
7     184       40.55  3.00    Male    Yes  Sun  Dinner     2
8     187       30.46  2.00    Male    Yes  Sun  Dinner     5
9     207       38.73  3.00    Male    Yes  Sat  Dinner     4
10    210       30.06  2.00    Male    Yes  Sat  Dinner     3
11    219       30.14  3.09  Female    Yes  Sat  Dinner     4
12    237       32.83  1.17    Male    Yes  Sat  Dinner     2
print index:
index: 0
index: 1
index: 2
index: 3
index: 4
index: 5
index: 6
index: 7
index: 8
index: 9
index: 10
index: 11
index: 12

2017年6月15日 星期四

透過 Nginx proxy_pass 架構,進行 Service migration

有一個舊網站已活了數年,改造的方向不外乎提升 SEO、移除不需要的檔案、增加系統安全、架構拆分,或是基本的 Web Framework 的抽換使用等等。對於一個 IoT 產業來說,包袱多多,像是 device 不見得會更新到新版,更別說會跟隨 HTTP 301/302 去取得新資源,甚至新網站的開發還沒辦法一步到位全部切換,只好透過 Nginx proxy_pass 架構去處理相容並扛流量了。

在此使用 upstream 管理舊機器們,並且添加新的 log format 多紀錄 $upstream_addr 資訊以便後續維護:

log_format add_proxy_pass '$remote_addr - $remote_user [$time_local] [=$upstream_addr=] "$request" ' '$status $body_bytes_sent "$http_referer" ' '"$http_user_agent" "$http_x_forwarded_for"';

resolver 8.8.8.8;
upstream oldserver {
hostname1;
hostname2;
hostname3;
}


後續,都是在 nginx server {} 定義範圍下。

更改 log 記錄格式:

access_log  /var/log/nginx/access.log add_proxy_pass;

預期 http client 能處理 HTTP 301/302 的服務位置,給予更佳的 SEO URL:

location ~ old_page\.php$ {
return 301 $scheme://$host/new/page/;
}


對於不能用 HTTP 301/302 的,則改用 proxy_pass 機制:

location ~ ^/old/resource {
proxy_pass http://oldserver$uri;
}


對於,有些文件很清楚要更改內文關鍵字的,可以善用 ngx_http_sub_module:

location /old/resource/file\.json {
proxy_pass http://oldserver$uri;
sub_filter_types *;
sub_filter_once off;
sub_filter '//old.hostname/' '//cdn.hostname/';
}


也可以順順換成 CDN 架構囉。

2015年8月29日 星期六

Node.js 筆記 - 使用 Bloom Filter 實作大量 URL Checker/Filter (SPAM)

最近想要針對 UGC 資料進行過濾,首先要面對的就是 SPAM/18+ 資料,接著,沒想到聽到 Bloom Filter 字眼!這個學生時代就碰過的東西,竟然會被提及,就那把玩一下吧!對於 Bloom Filter 的用法需要留意一下,本身設計是用時間省空間的架構,並且有誤判的機率,只要用得恰當都還好啦。

有點久沒摸 node.js 了,就挑他來試試,立馬找到有人已經實作好了 XD https://www.npmjs.com/package/bloomfilter 我只好接著使用啦 :P

接著不知不覺就蹦出一個 url-spam-checker 了 :P 有需要想把玩的可以試試:

$ npm install url-spam-checker
$ vim test.js
var
sys = require('sys'),
path = require('path'),
url_spam_checker = require('url-spam-checker')
;

url_spam_checker.createServer([
function handle_resource(callback){
var ret = [];
ret.push('yahoo.com');
ret.push('google.com.tw');
callback(null, ret);
}
], 8000, sys.log, sys.log);
$ node test.js


就會在 8000 port 起了 HTTP server ,接著可以用 http://localhost:8000/?url=http://tw.yahoo.com 的方式測試,若存在會回傳 HTTP 200 OK,不存在則是 HTTP 404 NOT FOUND。

當要驗證的 URL = http://tw.yahoo.com 也會被判定 200 OK,因為這邊是檢驗 domain level 的,不是 hostname 而已,同理在 URL = http://yahoo.com.tw 則是 404 NOT FOUND。而上述 handle_resource 可以自行填寫,例如回傳個20萬筆也是 ok 的。

這邊在使用 Bloom Filter 時,其 bit space =  Pattern 數量 x 256,這是因為我設定 hash function 有 8 組,所以 256 = 2^8  囉。

有興趣可以參考這邊:https://www.npmjs.com/package/url-spam-checker

2014年9月3日 星期三

AWS 筆記 - 使用 Amazon Route53 設定 DNS SPF Record

如果說 MX 是用來提供寄件者得知 mail server 在哪邊,那 SPF 則是提供 mail receiver 驗證寄件者使用的 mail server 是不是接近已知、合法的 server。因此,設定 DNS SPF Record 是會降低信件誤判成垃圾郵件的機率。

採用 Amazon Route53 時,設定 TXT Record (有 SPF Record,但這次沒試)

"v=spf1 a mx a:YourServerHostname  ~all"

最後面的 ~all 代表上述未定義的,可能是錯的。若要強制歸類在錯誤,就用 -all 即可。

驗證方式(此例以 cs.nctu.edu.tw 為例):

$ nslookup -q=txt cs.nctu.edu.tw
...
cs.nctu.edu.tw  text = "v=spf1 a mx a:farewell.cs.nctu.edu.tw a:csmailer.cs.nctu.edu.tw a:tcsmailer.cs.nctu.edu.tw a:csmailgate.cs.nctu.edu.tw a:csmail1.cs.nctu.edu.tw a:csmail2.cs.nctu.edu.tw a:csws1.cs.nctu.edu.tw a:csws2.cs.nctu.edu.tw ~all"
...


可以看到 "v=spf1 ... " 資訊,代表 DNS TXT Record 設定無誤,記得這是有 dns cache 機制,不見得馬上更改或是馬上可以查詢到。

接著,可以用 Gmail 來測試,從自家 mail server 寄信到 Gmail,若沒有設定 DNS SPF Record ,會顯示:

Received-SPF: none (google.com: YourSender@YourMailServer does not designate permitted sender hosts) client-ip=YourMailServerIP;

若有設定 DNS SPF Record 但不在名單內,此例為 ~all 用法:

Received-SPF: softfail (google.com: domain of transitioning YourSender@YourMailServer does not designate YourMailServerIP as permitted sender) client-ip=YourMailServerIP;

若設定正確即在 DNS SPF Record 定義內:

Received-SPF: pass (google.com: domain of YourSender@YourMailServer designates YourMailServerIP as permitted sender) client-ip=YourMailServerIP;

要留意,如果租的機器是在一些常見的 VPS 時,對外走的可能是 IPv6 ,此時記得 DNS Reocrd 中,也要用 AAAA Record (IPv6) 定義。