2013年8月31日 星期六

SQLite Full-Text Searches 與 Custom Tokenizers 筆記 (FTS3/FTS4)

雖然敝公司的強項就是做 search engines 跟資料儲存管理,但研究其他家的 search 機制也是很基本的功夫。SQLite 小歸小,卻也五臟俱全,應該稱得上市面用戶最廣的資料庫系統吧?光 browser 或 mobile phone 就打趴一大片。

SQLITE Full-text Search 官方介紹網址: SQLite FTS3 and FTS4 Extensions

簡言之 FTS4 比 FTS3 更有效率,但也更吃資料空間。要留意的版本資狀態:
FTS4 is an enhancement to FTS3. FTS3 has been available since SQLite version 3.5.0 in 2007-09-04. The enhancements for FTS4 were added with SQLite version 3.7.4 on 2010-12-08.
至於 FTS3/FTS4 使用時機:
FTS4 is sometimes significantly faster than FTS3, even orders of magnitude faster depending on the query, though in the common case the performance of the two modules is similar. FTS4 also offers the enhanced matchinfo() outputs which can be useful in ranking the results of a MATCH operation. On the other hand, in the absence of a matchinfo=fts3 directive FTS4 requires a little more disk space than FTS3, though only a percent of two in most cases.
建立 FTS3/FTS4 Tables:

-- Create an FTS table named "pages" with three columns:
CREATE VIRTUAL TABLE pages USING fts4(title, keywords, body);

-- Create an FTS table named "mail" with two columns. Datatypes
-- and column constraints are specified along with each column. These
-- are completely ignored by FTS and SQLite.
CREATE VIRTUAL TABLE mail USING fts3(
  subject VARCHAR(256) NOT NULL,
  body TEXT CHECK(length(body)<10240)
);


至於 FTS Queries 範例:

-- The examples in this block assume the following FTS table:
CREATE VIRTUAL TABLE mail USING fts3(subject, body);

SELECT * FROM mail WHERE rowid = 15;                -- Fast. Rowid lookup.
SELECT * FROM mail WHERE body MATCH 'sqlite';       -- Fast. Full-text query.
SELECT * FROM mail WHERE mail MATCH 'search';       -- Fast. Full-text query.
SELECT * FROM mail WHERE rowid BETWEEN 15 AND 20;   -- Slow. Linear scan.
SELECT * FROM mail WHERE subject = 'database';      -- Slow. Linear scan.
SELECT * FROM mail WHERE subject MATCH 'database';  -- Fast. Full-text query.


以及這段:

-- Example schema
CREATE VIRTUAL TABLE mail USING fts3(subject, body);

-- Example table population
INSERT INTO mail(docid, subject, body) VALUES(1, 'software feedback', 'found it too slow');
INSERT INTO mail(docid, subject, body) VALUES(2, 'software feedback', 'no feedback');
INSERT INTO mail(docid, subject, body) VALUES(3, 'slow lunch order',  'was a software problem');

-- Example queries
SELECT * FROM mail WHERE subject MATCH 'software';    -- Selects rows 1 and 2
SELECT * FROM mail WHERE body    MATCH 'feedback';    -- Selects row 2
SELECT * FROM mail WHERE mail    MATCH 'software';    -- Selects rows 1, 2 and 3
SELECT * FROM mail WHERE mail    MATCH 'slow';        -- Selects rows 1 and 3


接著,提提要使用 FTS3 / FTS4 的用法,須要在 compile sqlite3 加上設定才行,預設沒有啟用,而啟用 FTS3 也會啟用 FTS4:

-DSQLITE_ENABLE_FTS3
-DSQLITE_ENABLE_FTS3_PARENTHESIS


CPPFLAGS="-DSQLITE_ENABLE_FTS3 -DSQLITE_ENABLE_FTS3_PARENTHESIS" ./configure <configure options>

此外,切 token 預設可選的機制有 "simple", "porter" (Porter Stemming algorithm), "icu" (需要SQLITE_ENABLE_ICU, 要有C版ICU Library), 和 "unicode61" (SQLite version 3.7.13之後支援)。

-- Create an FTS table named "papers" with two columns that uses
-- the tokenizer "porter".
CREATE VIRTUAL TABLE papers USING fts3(author, document, tokenize=porter);

-- Create an FTS table with a single column - "content" - that uses
-- the "simple" tokenizer.
CREATE VIRTUAL TABLE data USING fts4(tokenize=simple);

-- Create an FTS table with two columns that uses the "icu" tokenizer.
-- The qualifier "en_AU" is passed to the tokenizer implementation
CREATE VIRTUAL TABLE names USING fts3(a, b, tokenize=icu en_AU);


其中 simple 就是會把資料都先轉成小寫,查詢時也會將 keyword 轉小寫;porter 則是支援相關字詞的搜尋,例如資料內是存 "frustrated" 字,但用 "Frustrated" 和 "Frustration” 都可以查到;icu library 全名則為 "International Components for Unicode" library;Unicode61 則跟 simple 很像,但支援 unicode,如 unicode 空白與鏢體符號(切 token 用的 delimiter)等,而 simple 只認得 ASCII 部分。

接著,進入正題 SQLite FTS 這迷人的架構就在於可自定 tokenizers 啦,也是這篇筆記的重點,Custom (User Implemented) Tokenizers,不過網站上只有片段程式碼,問了同事才知道接下來又要翻 code 才行 :P 於是建議我挑 simple_tokenizer 來看,在 sqlite3.c 中,可以搜尋 tokenizers 的描述:
The fts3 built-in tokenizers - "simple", "porter" and "icu"- are implemented in files fts3_tokenizer1.c, fts3_porter.c and fts3_icu.c respectively. The following three forward declarations are for functions declared in these files used to retrieve the respective implementations.
Calling sqlite3Fts3SimpleTokenizerModule() sets the value pointed to by the argument to point to the "simple" tokenizer implementation.
And so on.
故搜尋 fts3_tokenizer1.c 可得知以下的定義:

/*
** 2006 Oct 10
**
** The author disclaims copyright to this source code.  In place of
** a legal notice, here is a blessing:
**
**    May you do good and not evil.
**    May you find forgiveness for yourself and forgive others.
**    May you share freely, never taking more than you give.
**
******************************************************************************
**
** Implementation of the "simple" full-text-search tokenizer.
*/

typedef struct simple_tokenizer {
  sqlite3_tokenizer base;
  char delim[128];             /* flag ASCII delimiters */
} simple_tokenizer;

typedef struct simple_tokenizer_cursor {
  sqlite3_tokenizer_cursor base;
  const char *pInput;          /* input we are tokenizing */
  int nBytes;                  /* size of the input */
  int iOffset;                 /* current position in pInput */
  int iToken;                  /* index of next token to be returned */
  char *pToken;                /* storage for current token */
  int nTokenAllocated;         /* space allocated to zToken buffer */
} simple_tokenizer_cursor;

static int simpleDelim(simple_tokenizer *t, unsigned char c){
  return c<0x80 && t->delim[c];
}
static int fts3_isalnum(int x){
  return (x>='0' && x<='9') || (x>='A' && x<='Z') || (x>='a' && x<='z');
}

/*
** Create a new tokenizer instance.
*/
static int simpleCreate(
  int argc, const char * const *argv,
  sqlite3_tokenizer **ppTokenizer
){
// ...
}

/*
** Destroy a tokenizer
*/
static int simpleDestroy(sqlite3_tokenizer *pTokenizer){
  sqlite3_free(pTokenizer);
  return SQLITE_OK;
}

/*
** Prepare to begin tokenizing a particular string.  The input
** string to be tokenized is pInput[0..nBytes-1].  A cursor
** used to incrementally tokenize this string is returned in
** *ppCursor.
*/
static int simpleOpen(
  sqlite3_tokenizer *pTokenizer,         /* The tokenizer */
  const char *pInput, int nBytes,        /* String to be tokenized */
  sqlite3_tokenizer_cursor **ppCursor    /* OUT: Tokenization cursor */
){
// ...
}

/*
** Close a tokenization cursor previously opened by a call to
** simpleOpen() above.
*/
static int simpleClose(sqlite3_tokenizer_cursor *pCursor){
  simple_tokenizer_cursor *c = (simple_tokenizer_cursor *) pCursor;
  sqlite3_free(c->pToken);
  sqlite3_free(c);
  return SQLITE_OK;
}

/*
** Extract the next token from a tokenization cursor.  The cursor must
** have been opened by a prior call to simpleOpen().
*/
static int simpleNext(
  sqlite3_tokenizer_cursor *pCursor,  /* Cursor returned by simpleOpen */
  const char **ppToken,               /* OUT: *ppToken is the token text */
  int *pnBytes,                       /* OUT: Number of bytes in token */
  int *piStartOffset,                 /* OUT: Starting offset of token */
  int *piEndOffset,                   /* OUT: Ending offset of token */
  int *piPosition                     /* OUT: Position integer of token */
){
// ...
}

/*
** The set of routines that implement the simple tokenizer
*/
static const sqlite3_tokenizer_module simpleTokenizerModule = {
  0,
  simpleCreate,
  simpleDestroy,
  simpleOpen,
  simpleClose,
  simpleNext,
  0,
};

/*
** Allocate a new simple tokenizer.  Return a pointer to the new
** tokenizer in *ppModule
*/
SQLITE_PRIVATE void sqlite3Fts3SimpleTokenizerModule(
  sqlite3_tokenizer_module const**ppModule
){
  *ppModule = &simpleTokenizerModule;
}


從底部反過來往上看,至少要實作 Create, Destroy, Open, Close 和 Next,除了初始化跟資源釋放外,最重要的就是 Next 這個部分,簡單的說,就是把一串 byes 交給 Next,而 Next 每次被呼叫時,就從指定的位置往後找出一個 token 出來回傳,以此完成架構。

來做一個簡單的 changyy tokenizer 好了,只會把文章內有 changyy 開頭的 token 都取出來,其餘都 skip 掉:

/*
** Extract the next token from a tokenization cursor.  The cursor must
** have been opened by a prior call to simpleOpen().
*/
static int changyyNext(
  sqlite3_tokenizer_cursor *pCursor,  /* Cursor returned by simpleOpen */
  const char **ppToken,               /* OUT: *ppToken is the token text */
  int *pnBytes,                       /* OUT: Number of bytes in token */
  int *piStartOffset,                 /* OUT: Starting offset of token */
  int *piEndOffset,                   /* OUT: Ending offset of token */
  int *piPosition                     /* OUT: Position integer of token */
){
  changyy_tokenizer_cursor *c = (changyy_tokenizer_cursor *) pCursor;
  changyy_tokenizer *t = (changyy_tokenizer *) pCursor->pTokenizer;
  unsigned char *p = (unsigned char *)c->pInput;

  while( c->iOffset<c->nBytes ){
    int iStartOffset;

    /* Scan past delimiter characters */
    while( c->iOffset<c->nBytes && simpleDelim(t, p[c->iOffset]) ){
      c->iOffset++;
    }

    /* Count non-delimiter characters. */
    iStartOffset = c->iOffset;
    while( c->iOffset<c->nBytes && !simpleDelim(t, p[c->iOffset]) ){
      c->iOffset++;
    }

    if( c->iOffset>iStartOffset ){
      int i, n = c->iOffset-iStartOffset;
      if( n>c->nTokenAllocated ){
        char *pNew;
        c->nTokenAllocated = n+20;
        pNew = sqlite3_realloc(c->pToken, c->nTokenAllocated);
        if( !pNew ) return SQLITE_NOMEM;
        c->pToken = pNew;
      }
      for(i=0; i<n; i++){
        /* TODO(shess) This needs expansion to handle UTF-8
        ** case-insensitivity.
        */
        unsigned char ch = p[iStartOffset+i];
        c->pToken[i] = (char)((ch>='A' && ch<='Z') ? ch-'A'+'a' : ch);
      }
      *ppToken = c->pToken;
      *pnBytes = n;
      *piStartOffset = iStartOffset;
      *piEndOffset = c->iOffset;
      *piPosition = c->iToken++;
      if( !strncmp(c->pToken,"changyy", n > 7 ? 7 : n ) )
      return SQLITE_OK;
    }
  }
  return SQLITE_DONE;
}


上述程式取於 simple_tokenizer 架構,只在做後的 token 加上判斷而已 :) 如此一來,假設測資為 "changyy changes changyys world",那搜尋 changyy 跟 changyys 都可以找到,但搜尋 changes 和 world 都會找不到(因為不符合 token 規定 :P)

$ ./sqlite3
sqlite> .load /path/changyy.so
sqlite> CREATE VIRTUAL TABLE data USING fts3(tokenize=changyy);
sqlite> INSERT INTO data ('content') VALUES ('changyy changes changyys world');
sqlite> SELECT SNIPPET(data) FROM data WHERE data MATCH 'changyy';
<b>changyy</b> changes changyys world
sqlite> SELECT SNIPPET(data) FROM data WHERE data MATCH 'changes';
sqlite> SELECT SNIPPET(data) FROM data WHERE data MATCH 'changyys';
changyy changes <b>changyys</b> world
sqlite> SELECT SNIPPET(data) FROM data WHERE data MATCH 'world';
sqlite>


可以看到上述只有當 token 有被索引過的才能找出來,如此一來,就算完成偷懶的 custom tokenizer 學習吧 XD 更多操作請參考 https://github.com/changyy/sqlite-study 

2013年8月25日 星期日

[電影] 海苔億萬富翁 / The Billionaire / Top Secret / 泰國「小老板海苔」故事


大概可能有快半個月以上,在老家看了這齣電影,但只看了一半沒看完。昨晚想起來再繼續在 PPS 上看完 XD 這大概就跟電影 社群網戰(Social Network) 類似的創業型電影,但我比較喜歡小老闆海苔的故事。

小老闆海苔嗎?第一次吃是在當兵時期,同事推薦我吃看看,果真口感很不一樣呢,不過老家看電影時,也跑去買個兩包來吃,當時的心情就油了點,看了電影才會認清原來是油炸(過油)的啊。

最近周邊也有類似性格的人,我很佩服他們可以這樣不停地、不放棄地去執行所想的理想,回想起前陣子在 fb 聊天,還被學弟的老爸念了一頓:

「你們這樣跟PTT鄉民整天嘴砲有啥兩樣!」 

真是當頭棒喝啊!哈。但能夠這樣執行的人,真的是另一種幸福啊~

對小老闆海苔有興趣的人,可以多看幾篇簡介(大概是當時電影宣傳文章):

2013年8月24日 星期六

[Linux] 讓 Gitweb 支援 Markdown 顯示 @ Ubuntu 12.04

Gitweb & Markdown

之前同事很常用 Markdown 寫筆記,希望公司用的 gitweb 可以支援,所以我就稍微下海改一下 Perl 啦 XD 在改之前也有上網查了一下,其實 gitweb 本身已經有一個架構可以展現 repo/READM.html 的功能,其實搭配 git 可以弄成每次 project commit 後,自動將某個 markdown 檔案產生對應的 HTML 來用。

可在 /usr/share/gitweb/index.cgi 搜尋 READM.html 找到這片段程式碼:

# If XSS prevention is on, we don't include README.html.
# TODO: Allow a readme in some safe format.
if (!$prevent_xss && -s "$projectroot/$project/README.html") {
        print "<div class=\"title\">readme</div>\n" .
              "<div class=\"readme\">\n";
        insert_file("$projectroot/$project/README.html");
        print "\n</div>\n"; # class="readme"
}


但如此一來就侷限一個 project 只能展現的單一 markdown 檔案,思考一會後,我就選擇依照 gitweb 架構,在處理檔案時的 raw 項目,依樣畫葫做出一個 markdown 選項 XD

做法:
  1. 安裝 markdown ,讓系統支援 markdown 指定
  2. 找尋 sub git_blob_plain 程式碼,複製一份成 sub git_blob_markdown
  3. 找尋 raw 關鍵字,可以在 sub git_blob 中看到選單,只需在 raw 和 HEAD 中間插入 markdown 選單,並註冊 our %actions 處理此動作
  4. 修改 git_blob_markdown ,把它搞成讓 markdown 指令過水一下即可
片段程式碼:

our %actions = (
        ...
        "blob_plain" => \&git_blob_plain,
        "blob_markdown" => \&git_blob_markdown,
        ...
);


git_blob 片段程式碼:

$formats_nav .=
       $cgi->a({-href => href(action=>"history", -replay=>1)},
              "history") .
      " | " .
       $cgi->a({-href => href(action=>"blob_plain", -replay=>1)},
              "raw") .
      " | " .
      $cgi->a({-href => href(action=>"blob_markdown", -replay=>1)},
               "markdown") .
      " | " .

      $cgi->a({-href => href(action=>"blob",
                            hash_base=>"HEAD", file_name=>$file_name)},
              "HEAD");


git_blob_markdown:

sub git_blob_markdown {
        my $type = shift;
        my $expires;
        if (!defined $hash) {
                if (defined $file_name) {
                        my $base = $hash_base || git_get_head_hash($project);
                        $hash = git_get_hash_by_path($base, $file_name, "blob")
                                or die_error(404, "Cannot find file");
                } else {
                        die_error(400, "No file name defined");
                }
        } elsif ($hash =~ m/^[0-9a-fA-F]{40}$/) {
                # blobs defined by non-textual hash id's can be cached
                $expires = "+1d";
        }

        open my $fd, "git ".git_cmd()." cat-file blob $hash | markdown | "
        #open my $fd, "-|", git_cmd(), "cat-file", "blob", $hash
                or die_error(500, "Open git-cat-file blob '$hash' failed");

        $type = "text/html";

        # "save as" filename, even when no $file_name is given
        my $save_as = "$hash";
        if (defined $file_name) {
                $save_as = $file_name;
        } elsif ($type =~ m/^text\//) {
                $save_as .= '.txt';
        }

        my $sandbox = $prevent_xss &&
                $type !~ m!^(?:text/[a-z]+|image/(?:gif|png|jpeg))(?:[ ;]|$)!;


        print $cgi->header(
                -charset => 'UTF-8',
                -type => $type,
                -expires => $expires
                );
        local $/ = undef;
        binmode STDOUT, ':raw';
        print <$fd>;
        binmode STDOUT, ':utf8'; # as set at the beginning of gitweb.cgi
        close $fd;
}


比較特別的是...我還沒有真的搞懂 gitweb 或 perl 架構,像在 git_blob_markdown 裡頭,原本的架構是用 open my $fd, "-|", ... 繼續的,但我試了很久總搭不起來,就先偷懶用 "git" 代替了 :P 此外,若要增加 markdown 輸出的顯示,如 CSS 等,可以在 git_blob_markdown 下方的 printf <$fd>; 前面,去印一些 CSS 結構囉

2013年8月21日 星期三

[Linux] 增加 stack size 解決 g++ 編譯問題: Out of memory / virtual memory exhausted: Cannot allocate memory @ Ubuntu 12.04

最近在編譯同事的 C++ 程式時常常 crash 掉,噴訊息:
g++: internal compiler error: Killed (program cc1plus)
Please submit a full bug report,
with preprocessed source if appropriate.
See <file:///usr/share/doc/gcc-4.6/README.Bugs> for instructions.
追了一會兒後,才發現自己編譯 boost 1.54.0 也碰過這種事,查看 dmesg 有類似的訊息:
Out of memory: Kill process 5309 (cc1plus) score 327 or sacrifice child
Killed process 5309 (cc1plus) total-vm:720204kB, anon-rss:18672kB, file-rss:8kB
例如編譯 boost 1.54.0:
~/boost_1_54_0$ "g++"  -ftemplate-depth-128 -O3 -finline-functions -Wno-inline -Wall -pthread -fPIC -fno-strict-aliasing -ftemplate-depth-1024 -DBOOST_ALL_NO_LIB=1 -DBOOST_CHRONO_DYN_LINK=1 -DBOOST_DATE_TIME_DYN_LINK=1 -DBOOST_FILESYSTEM_DYN_LINK=1 -DBOOST_LOG_DYN_LINK=1 -DBOOST_LOG_SETUP_BUILDING_THE_LIB=1 -DBOOST_LOG_SETUP_DLL -DBOOST_LOG_USE_NATIVE_SYSLOG -DBOOST_LOG_USE_SSSE3 -DBOOST_LOG_WITHOUT_EVENT_LOG -DBOOST_SPIRIT_USE_PHOENIX_V3=1 -DBOOST_SYSTEM_DYN_LINK=1 -DBOOST_SYSTEM_NO_DEPRECATED -DBOOST_THREAD_BUILD_DLL=1 -DBOOST_THREAD_DONT_USE_CHRONO=1 -DBOOST_THREAD_POSIX -DBOOST_THREAD_USE_DLL=1 -DDATE_TIME_INLINE -DNDEBUG  -I"." -c -o "bin.v2/libs/log/build/gcc-4.6/release/build-no/log-api-unix/threading-multi/settings_parser.o" "libs/log/src/settings_parser.cpp"
噴訊息:
virtual memory exhausted: Cannot allocate memory
增加 stack-size 後 (-Wl,--stack=0x2000000),即可解決:

~/boost_1_54_0$ "g++" -Wl,--stack=0x2000000 -ftemplate-depth-128 -O3 -finline-functions -Wno-inline -Wall -pthread -fPIC -fno-strict-aliasing -ftemplate-depth-1024 -DBOOST_ALL_NO_LIB=1 -DBOOST_CHRONO_DYN_LINK=1 -DBOOST_DATE_TIME_DYN_LINK=1 -DBOOST_FILESYSTEM_DYN_LINK=1 -DBOOST_LOG_DYN_LINK=1 -DBOOST_LOG_SETUP_BUILDING_THE_LIB=1 -DBOOST_LOG_SETUP_DLL -DBOOST_LOG_USE_NATIVE_SYSLOG -DBOOST_LOG_USE_SSSE3 -DBOOST_LOG_WITHOUT_EVENT_LOG -DBOOST_SPIRIT_USE_PHOENIX_V3=1 -DBOOST_SYSTEM_DYN_LINK=1 -DBOOST_SYSTEM_NO_DEPRECATED -DBOOST_THREAD_BUILD_DLL=1 -DBOOST_THREAD_DONT_USE_CHRONO=1 -DBOOST_THREAD_POSIX -DBOOST_THREAD_USE_DLL=1 -DDATE_TIME_INLINE -DNDEBUG  -I"." -c -o "bin.v2/libs/log/build/gcc-4.6/release/build-no/log-api-unix/threading-multi/settings_parser.o" "libs/log/src/settings_parser.cpp"

對於編譯 boost 時,或許可以這樣用(更正確的用法應該是 LD_FLAGS):

~/boost_1_54_0$ ./bootstrap.sh
~/boost_1_54_0$ CXX="g++ -Wl,--stack=0x2000000" ./b2 -j2

2013年8月16日 星期五

[OSX] 使用 MacPorts 安裝 Boost 1.54.0 和 wxWidgets 2.9.5 (c++11, std=c++11, stdlib=libc++) @ Mac 10.8

最近用有案子 Boost 1.54.0 和 wxWidgets 2.9.5 來開發 OSX app,而採用 MacPorts 預設安裝 boost 跟 wxwidgets30 都只是預編好的,就算用 port -s 參數編出來的仍不支援 C++11。

然而編譯 boost 1.54.0 支援 c++11 也可以考慮用 brew 來安裝,只要加參數即可:

$ ruby -e "$(curl -fsSL https://raw.github.com/mxcl/homebrew/go)"
$ brew info boost
boost: stable 1.54.0 (bottled), HEAD
http://www.boost.org
Not installed
From: https://github.com/mxcl/homebrew/commits/master/Library/Formula/boost.rb
==> Options
--universal
        Build a universal binary
--with-c++11
        Compile using Clang, std=c++11 and stdlib=libc++
--with-icu
        Build regexp engine with icu support
--with-mpi
        Build with mpi support
--without-python
        Build without python support
--without-single
        Disable building single-threading variant
--without-static
        Disable building static library variant
$ brew install boost --with-c++11


但 brew 裡的 wxwidgets 只有到 2.9.4 版:

$ brew info wxwidgets
wxmac: stable 2.9.4.0
http://www.wxwidgets.org
Not installed
From: https://github.com/mxcl/homebrew/commits/master/Library/Formula/wxmac.rb
==> Options
--without-python
        Build without python support


摸索了一下 MacPorts 後,可以透過參數編譯使之支援 C++11:

$ port info boost wxwidgets30
boost @1.54.0 (devel)
Variants:             debug, [+]no_single, [+]no_static, openmpi, python25, python26, [+]python27, python31, python32, python33,
                      regex_match_extra, universal

Description:          Boost provides free portable peer-reviewed C++ libraries. The emphasis is on portable libraries which work
                      well with the C++ Standard Library.
Homepage:             http://www.boost.org

Library Dependencies: zlib, expat, bzip2, libiconv, icu, python27
Platforms:            darwin
License:              Boost-1
Maintainers:          nomaintainer@macports.org
--
wxWidgets30 @2.9.5_2 (graphics, devel)
Variants:             aui, debug, monolithic, [+]sdl, stdlib, universal

Description:          wxWidgets is a mature open-source cross-platform C++ GUI framework for Mac OS, Unix, Linux, Windows. It can
                      make use of a variety of native widget sets as well as its own widget set: Mac OS, GTK+, Motif, WIN32.
                      wxWidgets will even run on embedded systems using Linux and X11.
Homepage:             http://www.wxwidgets.org/

Library Dependencies: jpeg, tiff, libpng, zlib, libiconv, expat, libsdl, libsdl_mixer
Conflicts with:       wxgtk, wxWidgets
Platforms:            darwin
License:              wxwidgets-3.1
Maintainers:          jwa@macports.org, mojca@macports.org

$ sudo port install wxwidgets30
$ sudo port uninstall wxwidgets30
$ sudo port install -s wxWidgets30 configure.cc=clang configure.cxx="clang++ -std=c++11 -stdlib=libc++" configure.cxxflags="-std=c++11 -stdlib=libc++ -O2" configure.objcxxflags="-std=c++11 -stdlib=libc++ -O2"

$ sudo port install boost
$ sudo port uninstall boost
$ sudo port install -s boost configure.cc=clang configure.cxx="clang++ -std=c++11 -stdlib=libc++" configure.cxxflags="-std=c++11 -stdlib=libc++ -O2" configure.objcxxflags="-std=c++11 -stdlib=libc++ -O2"

[OSX] 使用 MacPorts 指定參數編譯 Source code 筆記 @ Mac 10.8

最近在開發 OSX app 時,常常會碰到一些 library 找不到或需要客制化的問題,例如以 clang++ 與 -stdlib=libc++ -std=c++11 等相關參數的指定。

以 wxWidgets30 為例,若單純用 sudo port install wxWidgets30 時,預設會直接安裝已編好的 binary 檔案,若想要強制 source code 編譯,則用 sudo port install -s wxWidgets30。

但從 source code 編譯時,有想要下一些 configure 參數咧?那就用 configure.args 吧!

$ sudo port install -s wxWidgets30 configure.args="--with-osx_cocoa --with-libiconv=no --with-macosx-sdk=/Applications/Xcode.app/Contents/Developer/Platforms/MacOSX.platform/Developer/SDKs/MacOSX10.8.sdk --with-macosx-version-min=10.7 --disable-shared --disable-debug"

如此一來,看 log 時可以找到它在 configure 真的下了這些參數。那 CXXFLAGS 、LDFLAGS 呢?一樣用 configure.cxxflags 和 configure.ldflags 處理。

然而,有時 configure.cxxflags 沒有滲透很深,那就改用 configure.cxx="clang++ -std=c++11 -stdlib=libc++" 來處理吧 :P

故以 wxWidgets30 為例,想要編出支援 c++11 的方式(可以先用 port install wxWidgets30 補完相依性後,再用 port uninstall wxWidgets30 後,再開始用 port -s install wxWidgets30):

$ port info wxWidgets30
wxWidgets30 @2.9.5_2 (graphics, devel)
Variants:             aui, debug, monolithic, [+]sdl, stdlib, universal

Description:          wxWidgets is a mature open-source cross-platform C++ GUI framework for Mac OS, Unix, Linux, Windows. It can
                      make use of a variety of native widget sets as well as its own widget set: Mac OS, GTK+, Motif, WIN32.
                      wxWidgets will even run on embedded systems using Linux and X11.
Homepage:             http://www.wxwidgets.org/

Library Dependencies: jpeg, tiff, libpng, zlib, libiconv, expat, libsdl, libsdl_mixer
Conflicts with:       wxgtk, wxWidgets
Platforms:            darwin
License:              wxwidgets-3.1
Maintainers:          jwa@macports.org, mojca@macports.org

$ sudo port install -s wxWidgets30 configure.cc=clang configure.cxx="clang++ -std=c++11 -stdlib=libc++" configure.cxxflags="-std=c++11 -stdlib=libc++ -O2" configure.objcxxflags="-std=c++11 -stdlib=libc++ -O2"

[OSX] iCloud Document 與 Dropbox 同步設定 @ Mac 10.8

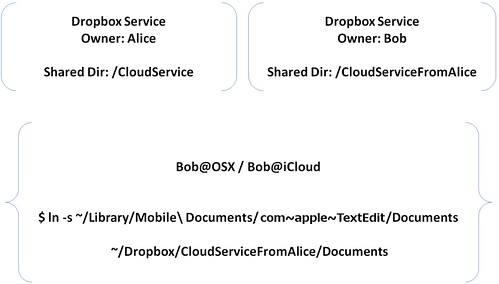
icloud & dropbox

最近又恢復到當兵時期的多雲工作模式,依靠 Dropbox 服務來處理異質環境

主因是 Apple 用 iCloud 服務,剛好我在 OSX 滿常用 TextEdit 來編輯一些文件,這時候就希望 iCloud 裡的文件可以再多台機器上觀看,故弄一下簡單的整合方式就是透過 Dropbox 服務。

首先要找出 OSX 的 iCloud 文件位置:

$ ls ~/Library/Mobile\ Documents/com~apple~TextEdit/Documents

描述現況環境:

  • 共有 2 台電腦,一台 OSX ,另一台 Windows
  • 共有 2 個 Dropbox Account (Alice@dropbox, Bob@dropbox)
  • 共有 1 個 iCloud Account (Bob@iCloud)
首先,以 Windows + Alice@Dropbox 作為基準,安裝完 Dropbox 後,建一個目錄 CloudService 目錄後,並分享給 Bob@dropbox,假設 Bob 得到的目錄是 ~/Dropbox/CloudServiceFromAlice。


在 Bob@dropbox 裡建立一個 symbolic link 讓同步 OSX 的 ~/Library/Mobile\ Documents/com~apple~TextEdit/Documents目錄(請先備份好了,以免出事),如此一來,就等同於把 Bob@iCloud 的文件分享到 Dropbox 服務上,而 Alice@dropbox 也可以讀取此份文件

$ cd ~/Dropbox
$ ln -s ~/Library/Mobile\ Documents/com~apple~TextEdit/Documents ~/Dropbox/CloudServiceFromAlice/Documents

2013年8月13日 星期二

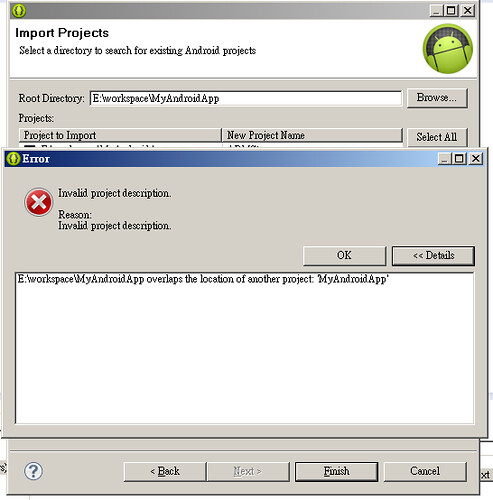
Android 開發筆記 - Eclipse Import: Invalid project description. overlaps the location of another project

android_imporInvalid project description. overlaps the location of another projectt_projects

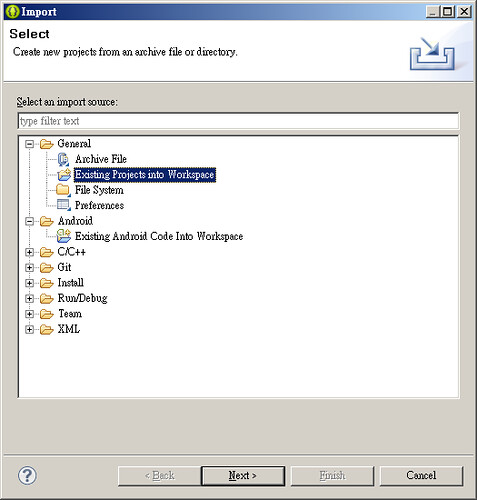
最近開發 project 後,總會有個機會搬來搬去、移來移去,甚至換電腦,這時若想要把既有的 projects 移到常用的 workspace ,並用 Eclipse > File > Import > Android > Existing Android Code Into Workspace 時,就會出現上述的訊息:Invalid project description. overlaps the location of another project

android_import_projects

解法就只要改用 General > Existing Projects Into Workspace 就行了 :P

2013年8月12日 星期一

使用 ffmpeg 移除影片中的聲音 @ Windows

首先下載 ffmpeg static file:FFmpeg Windows BuildsZeranoe FFmpeg Builds 。

接著享受它快速轉換:

C:\> ffmpeg -i input.mov -vcodec copy -an output.mp4

大概快 2GB 且快六分鐘的影片,很快就轉完,剩 1.8GB

Android 開發筆記 - 解決小米 S2 adb devices 找不到的問題

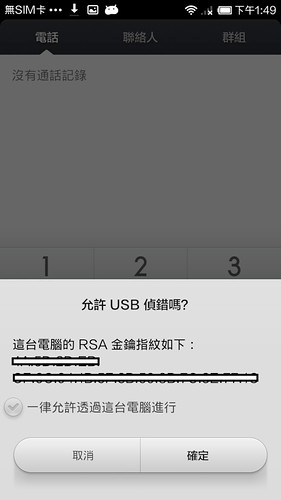
小米 s2

若要安裝相關驅動程式,可以參考這邊:图文详解小米手机驱动安装 / 驅動程式下載。但如此之後 adb devices 仍是找不到,真是神祕

原本以為只要把"開發人員選項"打開後,就可以找到裝置,但真正關鍵之處在於還要打電話 XD 請播打 *#*#717717#*#* 神秘組織的電話,方可聯絡方丈 *誤*

2013年8月10日 星期六

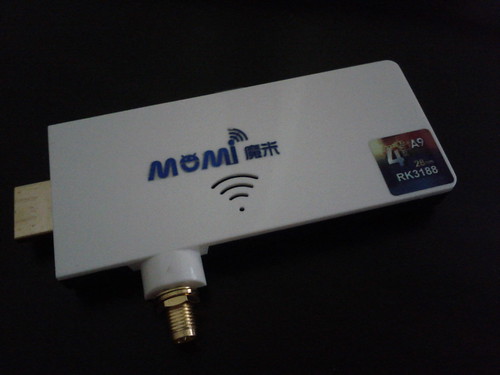
MOMI 魔米M1 把玩心得

MOMI 魔米M1

偶爾把玩約兩個星期,RK3188 四核心 A9 CPU,此版內建 8GB 空間,惡搞非常方便,用起來也很順。

此次使用的軟體版本是 Momi-M1_4.2__root_20130619.zip ,把它當成 server 不關機,可能有熱當的現象?例如開機一陣子後,重開機時,曾碰過進不了畫面,或是進入後 wifi 網路不會自動重啓,並且手動啓動 wifi 也開不了等,須拔掉電源線過一陣子(30秒~3分鐘)再重新啓動才能解決,但也不排除是 app 惹的禍或是冷氣不夠冷 XD

其他不方便的地方是在上頭寫程式的問題,因為 adb devices 偵測不到,無法方便地看到 console 端噴的訊息,寫 Android app 實在綁手綁腳。討論區提供的 windows drives 應該是燒機時用的且 Windows XP 比較順利。

扣除上述工程師的抱怨外,我倒還是會推薦一般使用者用看看 :D 露天大概賣台幣2000上下,CP值不錯。

[OSX] 關掉 tar -czf 時產生多餘 ._* 開頭的檔案 @ Mac 10.8

使用 tar -zcvf result.tar.gz reslut_dir 後,用 tar -tvf result.tar.gz 時,會看到多餘的 ._ 開頭的檔案。

例如 result_dir 只有 test.sh ,但壓縮完會多 ._test.sh 檔案:

$ ls result_dir
test.sh

$ tar -zcvf result.tar.gz result_dir
a result_dir
a result_dir/test.sh

$ tar -tvf result.tar.gz
result_dir/._test.sh
result_dir/test.sh


關掉方式是設定環境變數 COPYFILE_DISABLE=1,例如一次性 COPYFILE_DISABLE=1 的用法:

$ COPYFILE_DISABLE=1 tar -zcvf result.tar.gz result_dir

2013年8月9日 星期五

Android 開發筆記 - 依照檔案 Content-type / MIME Type 開啓對應 app

專門的 app 一定會希望無時無刻把使用者留在自己家裡,但是什麼都自己來真的太累了 XD 所以,處理特定 Content-type 檔案時,就乾脆叫出系統內其他 app 來負責吧!鄉民用語:「閃開!讓專業的來!」

File file = new File("/sdcard/path/file");
Intent mIntent = new Intent();
mIntent.setAction(Intent.ACTION_VIEW);
mIntent.setFlags(Intent.FLAG_ACTIVITY_NEW_TASK);
mIntent.setDataAndType(Uri.fromFile(file), "image/jpeg");
startActivity(mIntent);


上述建立在自己知道該檔案類型,若不知道的話,就先用其他方式找吧!

此外,連續用上述方式開啓 3 次檔案,就必須連按三次 back 鍵才能離開外部 app 回到自家 app,這時可以透過 Intent.FLAG_ACTIVITY_NO_HISTORY 來限制外部 app 一離開前景就不進 history ,方便按一下 back 就回去自家 app 啦

mIntent.setFlags(Intent.FLAG_ACTIVITY_NEW_TASK|Intent.FLAG_ACTIVITY_NO_HISTORY);

Android 開發筆記 - 從 Android Service 發動 startActivity

若是只是單純從一個 Activity 發動另一個 Activity:

startActivity(new Intent(Intent.ACTION_VIEW, Uri.parse("http://www.google.com.tw")));

若是從 Service 發動 StartActivity 則需須指定 Intent.FLAG_ACTIVITY_NEW_TASK 方可正常運行:

Intent mIntent = new Intent(Intent.ACTION_VIEW, Uri.parse("http://www.google.com.tw"));
mIntent.setFlags(Intent.FLAG_ACTIVITY_NEW_TASK);
startActivity(mIntent);

[Linux] 解決 apt-get 之 gzip: stdout: No space left on device 問題 @ Ubuntu 12.04 Server

噴訊息:

gzip: stdout: No space left on device
E: mkinitramfs failure cpio 141 gzip 1
update-initramfs: failed for /boot/initrd.img-#.#.#-##-generic with 1.
dpkg: error processing initramfs-tools (--configure):
 subprocess installed post-installation script returned error exit status 1
Errors were encountered while processing:
 initramfs-tools
E: Sub-process /usr/bin/dpkg returned an error code (1)

接著查看 /boot:

$ df  -h
Filesystem              Size  Used Avail Use% Mounted on
...
/dev/sda1               228M  218M     0 100% /boot


解法:

$ uname -a
Linux 3.2.0-51-generic #77-Ubuntu SMP Wed Jul 24 20:18:19 UTC 2013 x86_64 x86_64 x86_64 GNU/Linux

代表現在跑 Linux 3.2.0-51 也算正常吧,那就把其他清掉吧

$ dpkg -l 'linux-image-*' | grep '^ii'
ii  linux-image-3.2.0-29-generic        3.2.0-29.46                         Linux kernel image for version 3.2.0 on 64 bit x86 SMP
ii  linux-image-3.2.0-35-generic        3.2.0-35.55                         Linux kernel image for version 3.2.0 on 64 bit x86 SMP
ii  linux-image-3.2.0-37-generic        3.2.0-37.58                         Linux kernel image for version 3.2.0 on 64 bit x86 SMP
ii  linux-image-3.2.0-38-generic        3.2.0-38.61                         Linux kernel image for version 3.2.0 on 64 bit x86 SMP
ii  linux-image-3.2.0-39-generic        3.2.0-39.62                         Linux kernel image for version 3.2.0 on 64 bit x86 SMP
ii  linux-image-3.2.0-40-generic        3.2.0-40.64                         Linux kernel image for version 3.2.0 on 64 bit x86 SMP
ii  linux-image-3.2.0-41-generic        3.2.0-41.66                         Linux kernel image for version 3.2.0 on 64 bit x86 SMP
ii  linux-image-3.2.0-43-generic        3.2.0-43.68                         Linux kernel image for version 3.2.0 on 64 bit x86 SMP
ii  linux-image-3.2.0-44-generic        3.2.0-44.69                         Linux kernel image for version 3.2.0 on 64 bit x86 SMP
ii  linux-image-3.2.0-45-generic        3.2.0-45.70                         Linux kernel image for version 3.2.0 on 64 bit x86 SMP
ii  linux-image-3.2.0-48-generic        3.2.0-48.74                         Linux kernel image for version 3.2.0 on 64 bit x86 SMP
ii  linux-image-3.2.0-49-generic        3.2.0-49.75                         Linux kernel image for version 3.2.0 on 64 bit x86 SMP
ii  linux-image-3.2.0-51-generic        3.2.0-51.77                         Linux kernel image for version 3.2.0 on 64 bit x86 SMP
ii  linux-image-server                  3.2.0.51.61                         Linux kernel image on Server Equipment

開始慢慢清掉之前裝過的:(此例還保留前一份linux-image-3.2.0-49-generic這份)

$ sudo apt-get purge linux-image-3.2.0-29-generic linux-image-3.2.0-35-generic linux-image-3.2.0-37-generic linux-image-3.2.0-38-generic linux-image-3.2.0-39-generic linux-image-3.2.0-40-generic linux-image-3.2.0-41-generic linux-image-3.2.0-43-generic linux-image-3.2.0-44-generic linux-image-3.2.0-45-generic  linux-image-3.2.0-48-generic

再次查看: 

$ df -h
Filesystem              Size  Used Avail Use% Mounted on
...
/dev/sda1               228M   51M  165M  24% /boot


收工

2013年8月8日 星期四

Android 開發筆記 - 開機自動啓動 Android Service

開機自動啓動主要是指 Android service 的部分,整體上 Android 有非常豐富的事件管理,想要開機啓動就只需要去接收開機事件,收到後在執行 service 即可,架構:

  • 實作事件接收 public class MyEventsReceiver extends BroadcastReceiver
  • 設定 AndroidManifest.xml 監聽的事件,部分事件是需要額外權限的,安裝軟體時會顯示給使用者

BroadcastReceiver:

package org.changyy.study;
public class MyEventsReceiver extends BroadcastReceiver {

Intent MyService;
@Override
public void onReceive(Context context, Intent intent) {
// TODO Auto-generated method stub
String action = intent.getAction();
if( action.compareTo("android.intent.action.BOOT_COMPLETED") == 0 ) {
MyService = new Intent(context, MyService.class);
   context.startService(MyService);
}
}
}


AndroidManifest.xml:

<uses-permission android:name="android.permission.RECEIVE_BOOT_COMPLETED"/>

<application
    android:icon="@drawable/ic_launcher"
    android:label="@string/app_name"
    android:theme="@style/AppTheme" >

    <service
        android:name="org.changyy.study.MyService"
        android:process=":MyService">
    </service>
    <receiver android:name="org.changyy.study.MyEventsReceiver">
        <intent-filter>
            <action android:name="android.intent.action.BOOT_COMPLETED"></action>
            <action android:name="android.intent.action.MEDIA_MOUNTED"/>
            <action android:name="android.intent.action.MEDIA_UNMOUNTED"/>
            <action android:name="android.intent.action.MEDIA_BAD_REMOVAL"/>
        </intent-filter>
    </receiver>
</application>


此例除了開機事件(android.intent.action.BOOT_COMPLETED)外,順便監聽了外部儲存媒體的插拔。簡單的說,如果要監聽一排的事件,就只要在 AndroidManifest.xml 填寫完後,在 MyEventsReceiver 裡的 onReceive 判斷,若每個事件都要做一樣的事則不用判斷去執行指定項目即可,若需要判斷可透過 intent.getAction() 處理。

2013年8月7日 星期三

Android 開發筆記 - 執行 script 筆記,特別是會處理 stdin 的 script 案例

最近在處理 LOA 開機啓動的設定,發現在 Android app 可以這樣就呼叫 sh 來執行 script 程式:

try {
Process mProcess = Runtime.getRuntime().exec("sh");
DataOutputStream mDataOutputStream = new DataOutputStream(mProcess.getOutputStream());
mDataOutputStream.writeBytes("sh /sdcard/test.sh > /sdcard/run.log \n");
mDataOutputStream.flush();
mDataOutputStream.close();
mProcess.waitFor();
} catch (Exception e) {
// TODO Auto-generated catch block
e.printStackTrace();
}


而此例 /sdcard/test.sh 為:

# cat test.sh
echo "Begin"
date

read something
#while [ 1 ] ;
#do
#        echo -n "."
#done

echo "End"
date


上述在 Android app 執行後,可以看到 /sdcard/run.log 顯示:

Begin
Wed Aug  7 21:54:13 CST 2013
End
Wed Aug  7 21:54:13 CST 2013


發現跑起來後,又緊接著關掉,追了很久才發現是 mDataOutputStream.close() 的影響 Orz 比較安全的解法是把 mProcess 和 mDataOutputStream 拉倒 class variable 等級,可隨著物件(此例為 Activity)存在而不被釋放:

public class TestActivity extends Activity {
Process mProcess;
DataOutputStream mDataOutputStream;
@Override
public void onCreate(Bundle savedInstanceState) {
super.onCreate(savedInstanceState);
try {
mProcess = Runtime.getRuntime().exec("sh");
mDataOutputStream = new DataOutputStream(mProcess.getOutputStream());
mDataOutputStream.writeBytes("sh /sdcard/test.sh > /sdcard/run.log \n");
mDataOutputStream.flush();
//mDataOutputStream.close();
//mProcess.waitFor();
} catch (Exception e) {
// TODO Auto-generated catch block
e.printStackTrace();
}
}
// …
}


回到對 LOA 的問題,是在於執行 sh 後,再透過 chroot 後就交給一隻 /root/init.sh  處理,而它會等 stdin 的資料,而 mDataOutputStream.close() 的結果就像給予 exit/logout/EOF 的現象,使得 LOA 一直起來後馬上又關掉了。

Android 開發筆記 - 開發需要 root 權限的程式,解決 Superuser Prompt 不顯示的問題

最近跟一間硬體商配合,發現他們提供的 root 版 Android 環境有點怪,以前我用 SSHDroid (ssh server) 去開 port 22 時,因為小於 1024 所以會需要 root 權限,這時候就會預期他們家安裝的 Superuser 會彈跳視窗出來,但…什麼卻沒發生且失敗了 Orz 當然,只要把 Superuser 設定成 all pass 時,就沒問題。

而後測試幾百次,應該可以用這招來強制 Superuser 彈跳出詢問視窗:

Process mProcess;
try {
mProcess = Runtime.getRuntime().exec("sh");
DataOutputStream mDataOutputStream = new DataOutputStream(mProcess.getOutputStream());
mDataOutputStream.writeBytes("su;");
mDataOutputStream.flush();
mDataOutputStream.close();
mProcess.waitFor();
} catch (IOException e) {
// TODO Auto-generated catch block
e.printStackTrace();
} catch (InterruptedException e) {
// TODO Auto-generated catch block
e.printStackTrace();
}


因此,若需要執行 root 權限,建議先用這招頂替一下 XD

2013年8月6日 星期二

Android 開發筆記 - 取得目前 Activity 資訊以及啓動特定 Activity 方法

最近在開發程式時,想要啓動特定 Activity 出來,這部分倒還滿容易找到資訊,順手筆記一下:

Command 用法:

$ am start -n com.google.android.browser/com.android.browser.BrowserActivity

程式碼呼叫:

Intent res = new Intent();
res.setComponent(new ComponentName("com.google.android.browser", "com.android.browser.BrowserActivity"));
this.startActivity(res);


提醒一下,並非所有 Activity 都可以被呼叫(沒有提供被呼叫的功能或其它問題),若用上述方式強制開啓會收到 java.lang.SecurityException: Permission Denial: starting Intent ... 等訊息。

此外,既然有想要開啓特定 Activity 的話,就會有得知目前 Activity 需求 :P 一樣用 adb shell 處理:

$ adb shell dumpsys window windows  | grep "mCurrentFocus\|mFocusedApp"
  mCurrentFocus=Window{### com.android.launcher/com.android.launcher2.Launcher paused=false}
  mFocusedApp=AppWindowToken{### token=Token{### ActivityRecord{### com.android.launcher/com.android.launcher2.Launcher}}}

2013年8月3日 星期六

[OSX] ls 顏色筆記 @ Mac 10.8

設定方式:

$ vim ~/.bash_profile
export CLICOLOR=1

另一種則是用 alias 來解:

$ vim ~/.bashrc
alias ls='ls -GF'

最後則是調色:

$ vim ~/.bash_profile
export CLICOLOR=1
export LSCOLORS=exfxcxdxbxegedabagacad

方便的調色服務:http://geoff.greer.fm/lscolors/

一歲的偽天龍人

night market

在台北不知不覺過了一年了,想起來也算是退伍一年,更仔細想想這一年似乎沒什麼成長?總是太餓了嗎?還是太蠢了呢?

回想起來,從萬華這邊起頭似乎很有緣分,扣除房東外,第一個跟我交談的是水電工,輕描淡寫地說住在這邊不要多想什麼,堅定正派信念,更要懂得珍惜長者。很妙地這些正不是資訊業的縮影?大家自恃著擁有搜尋引擎、開源碼,前輩們的價值以超過指數速度狂降,更別說生活上的大小事,都是先 Google 再說 :P 但一個銅板拍不響,也存在非常非常多的前輩只扛著年資討生活。

有一陣子我總想 PTT 上曾出現過的跑馬燈:「人人都想拯救世界,但是沒人幫媽媽洗碗…」,這句話含義真的很深很深。當我有機會陪家人時,發現自己也因此沒有多餘的行動力,一天總是只有那 24 小時,所以,這句話更重要的提醒是等價交換。極端點就是幫媽媽洗碗無法讓你拯救世界。

此外,想起市場規模的影響,年輕人回鄉不是壞事,以鄉村的角度是多了人力、青春活力,但以年輕人的角度來看,可能會因為缺少特別的資源而局限自己的長才,讓我想起跟一位上海 RD 聊天,他總說著有機會真的要去上海走一趟!以 Set-top box 來說,台灣最猛的頂多 400萬用戶,一年淘汰也了不起 20~40萬裝置,而每年的裝置可以養多大的公司?而大陸光一個省就超過了!這件事也讓我想起周邊一個雲端案例,用了 Hadoop/HBase 作出不錯的模組,但最後卡在台灣用量沒那麼多,真正會買單的客戶少,最後也終究遠離家鄉。這些例子或許都是特例,卻也紮實地說明了目前台灣有些東西為何如此。

經過這一年奇妙的旅程及回顧,讓我的思緒越來越清楚了。生活化的角度是要珍惜青春,但不必整天計較著付出就一定要得到什麼,卻也別忘了想要得到什麼就必須捨棄東西。

2013年8月1日 星期四

[Python] 使用 Bottle 開發簡易 CGI Prototype @ Ubuntu 12.04

Python Bottle 提供 web server 與簡易的 MVC framework 服務(或許稱不上MVC架構),且 bottle 單純只是一個 python 檔案而已,十分輕巧,姑且不論效能,但應該稱得上是個不錯的測試、製作 prototype 的好工具。

常見的簡易 Web server 用法:

$ cd /path/workdir
$ python -m SimpleHTTPServer


安裝 bottle (單純下載單一檔案):

$ wget --no-check-certificate http://bottlepy.org/bottle.py


撰寫相關程式碼(main.py):

from bottle import Bottle, request, response, run

import json
#import sqlite3
#conn = sqlite3.connect('/tmp/example.db')


app = Bottle()

@app.route('/test')
def test():
        out = { 'status': True }
        #print request.headers
        response.headers['Accept-Ranges'] = 'none'
        return json.dumps(out)

@app.route('/')
def rootTest():
        out = { 'status': True }
        out['request.url'] = request.url
        out['request.urlparts'] = request.urlparts
        out['request.fullpath'] = request.fullpath
        out['request.query_string'] = request.query_string
        out['request.script_name'] = request.script_name
        out['request.content_type'] = request.content_type
        out['request.is_xhr'] = request.is_xhr
        out['request.is_ajax'] = request.is_ajax
        out['request.auth'] = request.auth
        out['request.remote_route'] = request.remote_route
        out['request.remote_addr'] = request.remote_addr
        response.headers['X-My-Resonse-Header'] = 'none'
        return json.dumps(out)

run(app, host='127.0.0.1', port=8000)


執行:

$ python main.py
Bottle v0.12-dev server starting up (using WSGIRefServer())...
Listening on http://127.0.0.1:8000/

Hit Ctrl-C to quit.


如此就有一個包含 web server 跟簡易 APIs 可以被呼叫測試,並且不需去安裝 web server、處理 python cgi 等問題,十分方便啊。

此例執行結果:
提供 http://127.0.0.1:8000/test 位置,並回傳 {"status": true} 資料。

[Linux] 使用 C/C++ 撰寫 FastCGI 與 Nginx 設定筆記 @ Ubuntu 12.04

大概有半年了,跟 fastcgi 與 nginx 的淵源還不斷地繼續著,不過,開始更有機會真的用 C/C++ 寫 Fastcgi 啦,在此簡易筆記用法

/etc/nginx/sites-enabled/fcgidev:

server {
  listen 55688;

  root /tmp/fcgidev;
  client_max_body_size 0;

  location /fcgi {
    fastcgi_pass 127.0.0.1:55699;
    include /path/etc/fastcgi_params;
  }

  location / {
  }
}

用 C 撰寫 (https://github.com/changyy/fastcgi-study/blob/master/fcgi/main.c):

#include <stdlib.h>
#include <fcgi_stdio.h>

#define CGI_HEAD_BODY_SEPARATOR "\r\n\r\n"
#define CGI_CONTENT_TYPE_TEXT_HTML "Content-type: text/html"
#define CGI_CONTENT_TYPE_APPLICATION_JSON "Content-type: application/json"
#define CGI_WELCOME_HEAD CGI_CONTENT_TYPE_TEXT_HTML
#define CGI_WELCOME_BODY \
"<html>\
<head>\
<title>Hello FastCGI</title>\
</head>\
<body>\
<h1>Hello FastCGI</h1>\
</body>\
</html>"

int main(int argc, char** argv)
{
int count = 0;
while(FCGI_Accept() >= 0)
{
printf(
CGI_WELCOME_HEAD
CGI_HEAD_BODY_SEPARATOR
CGI_WELCOME_BODY
);
}
return 0;
}

編譯:

$ gcc -o fcgi-out main.c -lfcgi 

用 C++ 撰寫(https://github.com/changyy/fastcgi-study/blob/master/fcgicc/main.cpp):

#include <cstdlib>
#include "cgicc/Cgicc.h"
#include "cgicc/HTTPResponseHeader.h"
#include "cgicc/HTMLClasses.h"
#include "FCgiIO.hpp"

#define CGI_WELCOME_BODY \
"<html>\
<head>\
<title>Hello FastCGI</title>\
</head>\
<body>\
<h1>Hello FastCGI</h1>\
</body>\
</html>"

int main(int argc, char **argv)
{
if (argc < 2) exit(1);

FCGX_Request request;
FCGX_Init();
FCGX_InitRequest(&request, 0,0);

while(FCGX_Accept_r(&request) == 0)
{
try
{
cgicc::FCgiIO io(request);
cgicc::Cgicc cgi(&io);

cgicc::HTTPResponseHeader resp("Status:", 200, "OK");
resp.addHeader("Content-Type", "text/html");
io << CGI_WELCOME_BODY;
}
catch (std::exception const &e)
{
}
FCGX_Finish_r(&request);
}
return 0;
}


編譯:

$ g++ -o fcgi-out main.cpp FCgiIO.cpp -lfcgi -lcgicc -lfcgi++

執行:

$ spawn-fcgi -a 127.0.0.1 -n -p 55699 -F 1 -- fcgi-out /tmp